

Start Seeds Indoors: A Practical Guide for Home Gardeners
The short answer: start seeds indoors 2 to 10 weeks before your last frost date depending on the crop, using a sterile soilless mix, individual cells, 12 to 16 hours of direct light, and warm soil temperatures for heat loving vegetables. Skip any one of those and you’ll end up with pale, leggy seedlings that sulk for weeks after transplanting.
Here’s your starting checklist before you touch a single seed packet:
- Individual cell trays or small pots with drainage holes
- Sterile seed-starting mix (never garden soil)
- A grow light you can position 2 to 6 inches above the seedlings
- Waterproof tray, humidity dome, and permanent labels
- A heat mat if you’re growing tomatoes, peppers, or eggplant
Pro Tip: Buy your seed-starting mix and light source before your seeds arrive. Ordering supplies after your seeds show up is the single most common reason gardeners fall two weeks behind schedule.
Most seeds germinate fastest between 65°F and 86°F, then need conditions about 10 degrees cooler once they sprout. That temperature swing is where a lot of beginners get tripped up, and it’s the first thing worth planning around.
Key Takeaways
Starting seeds indoors successfully comes down to timing sowing dates to your last frost, using sterile cell trays instead of garden soil, and giving seedlings 12 to 16 hours of close, direct light.
| Point | Details |
|---|---|
| Count backward from frost | Time sowing by crop, from 2 weeks for greens to 10 weeks for peppers, based on your last frost date. |
| Use sterile mix and cells | Skip garden soil and large flats; individual cells with soilless mix prevent disease and root tangling. |
| Light beats a windowsill | Provide 12 to 16 hours of light daily, 2 to 6 inches from seedlings, since windowsills are usually too cold and inconsistent. |
| Water from the bottom | Bottom-watering and letting the surface dry between waterings prevents damping-off, the top cause of seedling loss. |
| Harden off for two weeks | Gradually acclimate seedlings outdoors over 14 days before transplanting to avoid transplant shock. |
| Consider a Gridwiseliving kit | Gridwiseliving’s microgreens starter kit or backyard greenhouse collection offer ready-made options for gardeners scaling up. |
Table of Contents
- When Should You Start Seeds Indoors?
- What Do You Need to Start Seeds Indoors?
- How Do You Sow and Germinate Seeds Indoors?
- How Much Light and Water Do Seedlings Need?
- Why Are My Seedlings Falling Over or Leggy?
- When Should You Transplant and Harden Off Seedlings?
- What Are Some Low-Cost Ways to Start Seeds Indoors?
- What Do Experienced Growers Do Differently?
- Why Gridwise Believes in Starting Your Own Seeds
- Ready to Grow Beyond the Windowsill?
- Frequently Asked Questions
- Sources
When Should You Start Seeds Indoors?
Forget the calendar for a second. The real question isn’t “what date is it” but “how many weeks until my last frost.” Count backward from that date, crop by crop, and you’ll avoid the single most common seed-starting mistake: starting too early, which produces weak, root-bound transplants that never fully recover once they hit the garden.
Fixed dates on a wall calendar don’t account for your specific microclimate, your growing zone, or the quirks of the vegetable you’re growing. A tomato and a head of lettuce have almost nothing in common timing-wise, yet gardeners often start them the same week out of habit.
Different crop families need wildly different lead times:
- Leafy greens (lettuce, spinach, kale): 2 to 4 weeks before last frost
- Cabbage and broccoli: 4 to 6 weeks before last frost
- Tomatoes: 5 to 6 weeks before last frost
- Cucumbers and melons: 3 to 5 weeks before last frost
- Peppers and eggplant: 8 to 10 weeks before last frost, since they’re notoriously slow to germinate and even slower to size up
These aren’t arbitrary numbers. University of Maryland Extension research backs each range, and the logic holds across most U.S. growing zones once you adjust for your own frost date.
Here’s a quick reference for common crops:
| Crop | Weeks Before Last Frost |
|---|---|
| Leafy greens (lettuce, spinach) | 2 to 4 weeks |
| Cabbage, broccoli | 4 to 6 weeks |
| Cucumbers, melons | 3 to 5 weeks |
| Tomatoes | 5 to 6 weeks |
| Peppers, eggplant | 8 to 10 weeks |
Onions are the outlier here. They often need 8 to 12 weeks indoors because they grow so slowly at first. And flowers vary enormously; petunias want 10 to 12 weeks, while zinnias barely need 4.
Because timing varies so much by crop and by region, it’s worth using a seed-starting date calculator rather than guessing. Johnny’s Selected Seeds notes that recommended start times can range anywhere from 2 to 16 weeks before transplanting depending on what you’re growing and where you live. If you’re gardening in a small space, pairing your seed-starting calendar with a smart layout matters too. Container gardening strategies can help you figure out where those trays will actually live once they’re germinating.
What Do You Need to Start Seeds Indoors?
Skip the garden soil. It compacts in small containers, drains poorly, and often carries fungal spores or weed seeds that cause problems the moment you bring it indoors. A sterile, soilless seed-starting mix made of peat or coir blended with vermiculite or perlite drains cleanly and holds just enough moisture without suffocating young roots.
If you’re reusing trays or pots from last season, don’t skip sanitation. A rinse of 1 part bleach to 9 parts water kills off lingering pathogens that cause damping-off, one of the fastest ways to lose an entire tray of seedlings overnight.
Containers: Individual cell trays beat large flats for almost every crop. Extension guides consistently recommend single-cell containers because they prevent root tangling between seedlings, which cuts down on transplant shock later. A cell size of 1.5 to 2 inches works for most vegetables; larger crops like squash benefit from 3 to 4 inch pots since they grow fast and resent being cramped.
Light: A sunny windowsill almost never delivers enough consistent light, even on the south side of the house. Extension research points to windowsills being the coldest spot in a room overnight and too inconsistent for reliable growth. A basic LED shop light on a timer, set for 12 to 16 hours a day, will outperform a windowsill nearly every time and costs less than you’d expect.
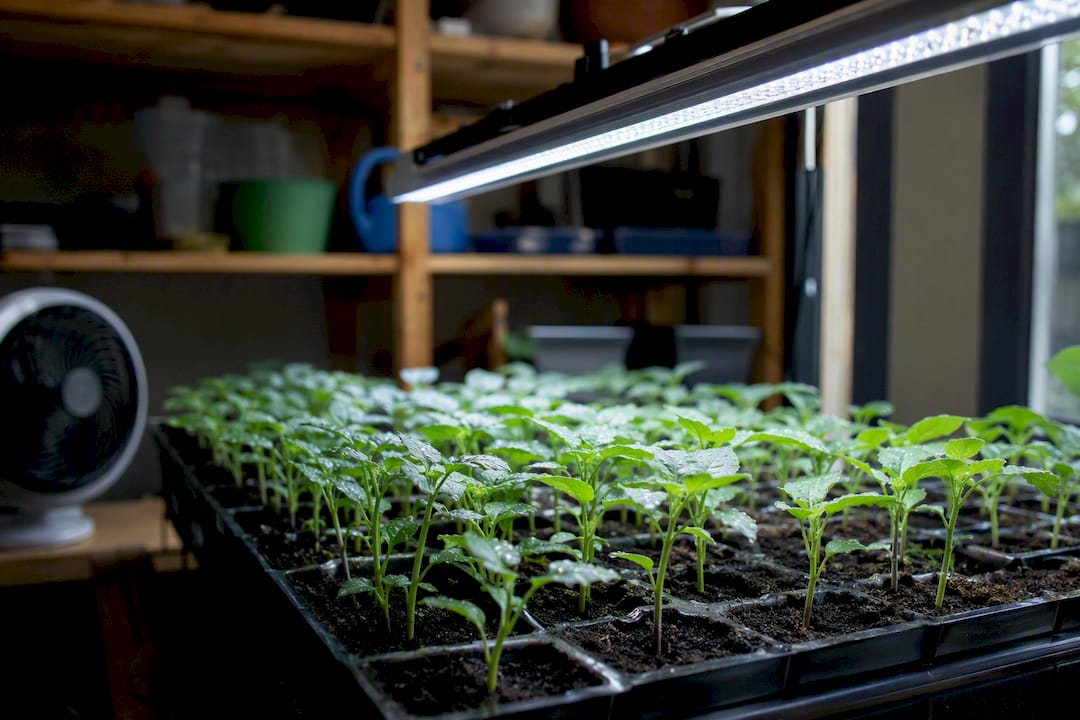
Heat: Tomatoes, peppers, and eggplant germinate faster and produce healthier root systems with bottom heat from a seedling heat mat, which typically raises the mix temperature 5 to 10 degrees above room temperature.
The small stuff: Waterproof trays to catch runoff, a humidity dome for the germination phase, a spray bottle for gentle watering, a wooden dibber or pencil for making sowing holes, and permanent labels. You will forget which cell is which variety within 48 hours without labels. Everyone does.
Pro Tip: Choose the smallest cell size that’s practical for your crop. Oversized containers hold too much wet mix around a tiny root system, which is one of the fastest routes to root rot and leggy, stretched-out seedlings.
How Do You Sow and Germinate Seeds Indoors?
Getting seeds into the mix correctly matters more than most gardeners assume. Follow these steps in order:
- Pre-moisten your mix in a bucket or tub until it feels like a wrung-out sponge, not soggy and not dusty.
- Fill your cells loosely, then tap the tray to settle the mix without compacting it.
- Sow at the right depth. The rule of thumb from Iowa State University Extension is to plant a seed about twice as deep as its width. Check your seed packet, since some seeds (like lettuce) need light to germinate and should barely be covered.
- Sow two seeds per cell for insurance, then thin to the strongest single seedling once true leaves appear. Sowing extra “just in case” and never thinning leads to crowded, weak plants competing for the same root space.
- Cover for humidity. A clear plastic dome or loose plastic wrap traps moisture during germination, which the Missouri Botanical Garden recommends removing the moment seedlings emerge.
- Water from the bottom by setting the tray in a shallow water bath for 10 to 15 minutes, which draws moisture upward without disturbing tiny seeds or crusting the surface.
Germination windows vary by crop group. Tomatoes and peppers typically take 6 to 14 days, leafy greens 5 to 10 days, and onions can drag on for 10 to 14 days. Once you see green, remove any cover immediately and move the tray under lights within a day.
Hold off on fertilizer until the first set of true leaves shows up, not the initial two seed leaves (called cotyledons). Feeding too soon can burn tender roots before they’re established.
Pro Tip: Check your trays twice a day during germination week. Seedlings can go from “just emerged” to “stretched and leggy” in under 24 hours if they’re not moved under light fast enough.
A short list of things not to do: don’t use garden soil, don’t set your light more than a few inches above the seedlings, and don’t water so often that the tray stays soggy for days at a stretch.
How Much Light and Water Do Seedlings Need?
Seedlings need 12 to 16 hours of light daily, and the fixture needs to sit close, usually 2 to 6 inches above the leaves for LED or fluorescent tubes. Extension guidance is blunt about this: lack of light is the leading cause of tall, weak, elongated stems. A windowsill simply can’t deliver that many consistent hours, especially in late winter when days are short and skies are gray more often than not.
Temperature works differently before and after germination. Most seeds sprout best between 65°F and 86°F, but once seedlings emerge, they actually grow sturdier at temperatures roughly 10 degrees cooler. That’s why bottom heat mats matter most during germination and can often be removed once seedlings are up and growing.
Watering trips up more beginners than almost anything else. Overwatering, not underwatering, is the top cause of damping-off, a fungal disease that topples seedlings at the soil line almost overnight. A few habits prevent it:
- Water from the bottom whenever possible, letting the mix wick moisture upward
- Let the surface dry slightly between waterings rather than keeping it constantly wet
- Make sure every tray has drainage holes and never let it sit in standing water for more than 15 minutes
- Skip fertilizer entirely until true leaves appear, then feed with a water-soluble fertilizer diluted to a quarter of the label strength, once a week
Air circulation matters just as much as watering. Stagnant, humid air around seedlings invites fungal problems fast. A small oscillating fan on low, run for a few hours a day, strengthens stems and keeps fungal spores from settling on the leaves.
Pro Tip: If your seedlings look thin and pale despite plenty of water, check the light distance before you assume it’s a nutrient problem. Nine times out of ten, it’s light, not food.
Why Are My Seedlings Falling Over or Leggy?
Most seed-starting failures trace back to one of four culprits, and each has a fast, practical fix.
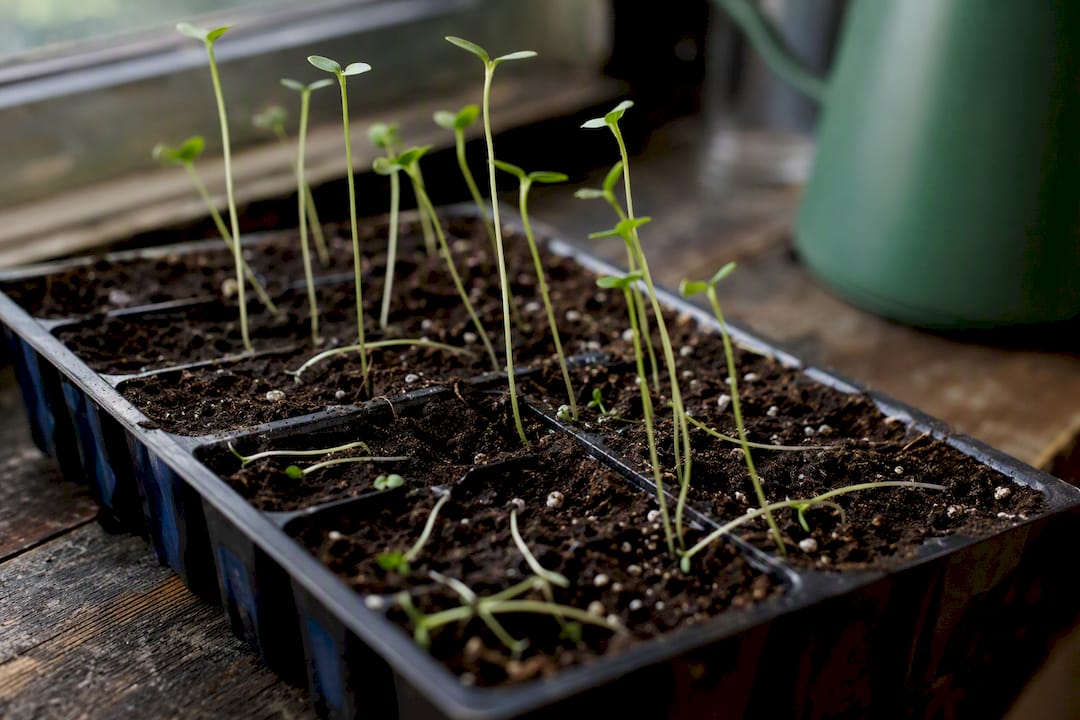
Collapsed or pinched stems at the soil line point to damping-off. Pull affected seedlings immediately, cut back watering, and improve airflow with a fan. There’s no reviving a collapsed stem, but you can save the rest of the tray by catching it early.
Tall, spindly, pale stems mean insufficient light, either too few hours or the fixture sitting too far away. Lower the light to 2 to 3 inches above the canopy and extend the daily duration toward 16 hours.
Yellowing leaves usually signal overwatering or a nutrient deficiency once true leaves are present. Check that the tray isn’t sitting in standing water first, since that’s the more common cause.
No germination after two weeks often means old seed, mix that dried out completely, or a soil temperature outside the crop’s ideal range. Check seed packet viability dates and confirm your heat mat is actually working.
A fast troubleshooting rundown:
- Stems collapsing → cut water, boost airflow, remove affected plants
- Legginess → move light closer, increase hours per day
- Yellow leaves → check drainage first, then consider a light feed
- Poor germination → verify seed age and soil temperature
Pro Tip: Keep one thermometer probe in your seed-starting mix, not just the room air. Room temperature and mix temperature can differ by several degrees, and that gap is often the real reason germination stalls.
The preventable mistakes are almost always the same: starting too early, cramming multiple seedlings into one cell without thinning, and relying on a windowsill instead of a dedicated light source.
When Should You Transplant and Harden Off Seedlings?
Pot up to a larger container once seedlings develop their first true leaves or once roots start circling the bottom of the cell, whichever comes first. Moving from a 1.5 inch cell to a 3 or 4 inch pot gives roots room to expand without shocking the plant.
Seedlings are ready for the garden when they show sturdy, non-floppy stems and a root system dense enough to hold the soil together when you gently pop them out of the cell. Timing that against your local last frost date is critical. Move too early and a late cold snap can wipe out weeks of work.
Hardening off takes about two weeks and should never be skipped, even for cold-hardy crops like broccoli or lettuce:
- Days 1 to 3: Set seedlings outside in a sheltered, shaded spot for 1 to 2 hours, then bring them back in.
- Days 4 to 7: Increase outdoor time to 3 to 4 hours, adding a bit of direct sun.
- Days 8 to 11: Leave them out for 6 to 8 hours, including a few hours of direct afternoon sun.
- Days 12 to 14: Leave seedlings outside overnight if temperatures stay above 50°F, then transplant.
If a cold snap or heavy storm rolls in during this window, just pause the schedule and resume once conditions calm down. Rushing hardening off to hit a deadline is how gardeners lose entire trays to wind or frost.
When transplant day arrives, plant in the late afternoon or on a cloudy day to reduce transplant shock from harsh sun. Water thoroughly right after planting, and keep a frost cloth or row cover on hand in case temperatures dip unexpectedly that first week.
What Are Some Low-Cost Ways to Start Seeds Indoors?
You don’t need a full grow room to get good results. Three setups cover most budgets and space constraints.
Recycled cups and a shop light costs almost nothing. Poke drainage holes in yogurt cups or similar containers, set them in a dollar-store tray, and hang a basic LED shop light above them on a timer. It works, though it takes more daily attention to watering since small containers dry out fast.
A shelving unit with LED tubes scales up nicely for gardeners starting more than a few dozen plants. Add a humidity dome for the germination phase and a timer so you’re not manually flipping switches twice a day.
A plug-and-play starter kit suits anyone who wants results without sourcing parts separately, and it’s especially handy for microgreens if you want a harvest in under two weeks rather than months.
| Setup | Cost | Best For |
|---|---|---|
| Recycled cups + shop light | Lowest | Small batches, tight budgets |
| Shelving unit + LED tubes | Mid-range | Larger seed-starting operations |
| Plug-and-play kit | Higher upfront | Beginners, gifts, fast results |
Once you’re regularly starting more than one tray a season, a heat mat and a proper shelf setup usually pay for themselves in germination success alone.
What Do Experienced Growers Do Differently?
Seasoned gardeners tend to follow the same handful of rules religiously, and it shows in their germination rates.
- Sterile, soilless mix every single time, never garden soil
- Individual cells sized to the crop, not oversized “just in case”
- Sowing dates counted backward from the local last frost, not a fixed calendar
- Reused trays sanitized with a bleach solution before each new season
- Lights kept close and run 12 to 16 hours daily, adjusted as seedlings grow
Pro Tip: Experienced growers check light height almost daily during the first two weeks, nudging it upward in small increments as seedlings gain height. That habit alone prevents most of the legginess beginners struggle with.
For deeper technical detail, the extension resources in the further reading section below cover soil temperature ranges, disease prevention, and crop-specific timing in more depth than any single article can.
Why Gridwise Believes in Starting Your Own Seeds
Growing from seed gives you access to varieties you’ll never find as nursery starts, at a fraction of the cost of buying transplants every spring. That’s the whole philosophy behind self-reliant living: control over your food supply starts with control over the smallest decisions, like which pepper variety actually thrives in your climate.
Once you’ve got the seed-starting rhythm down, the natural next step for a lot of gardeners is extending that control outdoors by learning how to level backyard spaces for a perfectly flat area to place greenhouses or garden beds. A backyard greenhouse lets you start earlier, protect seedlings from late frosts, and eventually grow food across more of the year than an indoor tray setup ever could.
Ready to Grow Beyond the Windowsill?
If you’d rather skip sourcing trays, mix, and lights separately, a ready-made kit solves that in one purchase. Gridwiseliving’s microgreens starter kit pairs a tray, seeds, and growing mats together, which is a fast way to get a harvest in weeks rather than months while you’re still dialing in your full seed-starting setup.

For gardeners ready to go further than trays on a shelf, a backyard greenhouse extends your growing season on both ends, protecting seedlings from late frosts and giving you room to start dozens of varieties at once instead of a handful under a shop light. Gridwiseliving builds these for durability and straightforward assembly, so you’re not troubleshooting the structure on top of everything else. Browse the greenhouse collection and find the size that fits your yard before your next planting season sneaks up on you.
Frequently Asked Questions
How early is too early to start seeds indoors? Starting more than 2 to 3 weeks beyond the recommended window for your crop usually produces root-bound, stressed transplants. Tomatoes started 10 weeks out, for example, often outgrow their pots before it’s warm enough to plant them outside.
Can I start seeds indoors without grow lights? You can, but germination and growth are far less reliable. Windowsills tend to run cold at night and rarely deliver enough consistent hours of light, which leads to stretched, weak stems. A basic LED shop light solves this for a modest cost.
Do I need a heat mat to start seeds indoors? Only for warm-season crops like tomatoes, peppers, and eggplant, where bottom heat speeds germination and improves root health. Cool-season crops like lettuce and broccoli germinate fine at room temperature without one.
How many seeds should I plant per cell? Sow two seeds per cell as insurance against poor germination, then thin to the strongest single seedling once true leaves appear. Leaving both seedlings in the cell crowds roots and weakens both plants.
When should I start feeding my seedlings? Wait until the first set of true leaves appears, not the initial seed leaves. Feed with a water-soluble fertilizer diluted to a quarter strength, once a week, until transplanting.
Sources
- Starting Vegetable Seeds Indoors | University of Maryland Extension
- Five common seed-starting mistakes and how (UC Master Gardener Program / UC ANR blog)
- Starting seeds indoors | UMN Extension
- How to successfully start seed indoors | Iowa State University Extension
- Seed-Starting Date Calculator: When to Start Seeds Indoors | Johnny’s Selected Seeds
- Starting Plants from Seed Indoors | Missouri Botanical Garden