

Greenhouse Pest Control: 10 Proven Methods for Home Growers
The single best move when you spot pests in your greenhouse is to follow Integrated Pest Management (IPM): isolate the affected plant, identify the pest, and start with the least-toxic option that will actually work. That sequence keeps beneficial insects alive, slows resistance, and costs less over a season than reaching for a spray bottle every time something goes wrong.
Here is a quick action plan you can run through today:
- Isolate any plant showing damage or visible pests before it touches anything else.
- Photograph the pest or collect a specimen in a sealed bag for accurate ID.
- Do a fast sanitation pass: remove dead leaves, clear debris from benches, and check drainage trays.
- Place yellow sticky cards at canopy height and near the soil surface to start tracking what is flying around.
- Spot-treat only the affected plant with the lowest-impact option that fits the pest (insecticidal soap, neem oil, or handpicking).
Pro Tip: Quarantine every new plant for at least two weeks in a separate space before it enters your main greenhouse. A single unscreened cutting can introduce spider mites, thrips, or whiteflies to an otherwise clean space. Yellow sticky cards placed near the quarantine area give you early warning before a problem spreads.
Key Takeaways
Effective greenhouse pest control starts with consistent monitoring and prevention, not with sprays. Follow the IPM hierarchy: prevent, monitor, and intervene with the least-toxic option that will actually work.
| Point | Details |
|---|---|
| Quarantine every new plant | Hold all incoming plants for two weeks in a separate zone before introducing them to your main greenhouse. |
| Monitor weekly with sticky cards | Place cards at canopy and soil level; count and record insects every seven days to catch problems early. |
| Start with biologicals and organics | Use predatory mites, parasitic wasps, Bt, neem oil, and insecticidal soap before reaching for conventional pesticides. |
| Use conventional pesticides selectively | Apply only after organic options fail, rotate modes of action, and always follow label, PPE, and REI requirements. |
| Keep short records after every treatment | Log pest counts, product applied, and outcome; review at season’s end to shift from reactive to preventive. |
Table of Contents
- What are the most common greenhouse pests and how do you spot them fast?
- How to keep pests out: greenhouse design, sanitation, and quarantine
- How to monitor like a pro: sticky cards, inspections, and thresholds
- Biological controls and organic products that actually work in greenhouses
- Mechanical and cultural tactics you can do today
- When to use conventional pesticides, how to stay safe, and how to avoid resistance
- A step-by-step response plan for when you discover pests
- When pests are most likely to strike: growth stages and seasonal timing
- How to choose reliable biologicals, monitoring tools, and safe spray products
- Pest life cycles and why timing your controls around them matters
- Diseases that often follow pest damage in greenhouses
- How to choose between organic and conventional controls based on pest pressure and crop type
- What to do after treatment: follow-up monitoring and evaluation
- Recordkeeping best practices for pest control interventions
- Why IPM-first is the only approach that actually holds up over time
- Ready to grow in a greenhouse built for pest prevention?
- Sources
What are the most common greenhouse pests and how do you spot them fast?
Misidentifying a pest is the most expensive mistake you can make, because the wrong treatment wastes money and can harm your plants. Each pest leaves a signature.
Aphids cluster on new growth and the undersides of leaves. Look for sticky honeydew residue and the sooty mold that follows it. Soft-bodied, pear-shaped, and often green or black, they reproduce fast in warm greenhouses. First-line response: blast them off with water, then apply insecticidal soap.
Whiteflies scatter in a white cloud when you brush a plant. Adults hide on leaf undersides; nymphs look like tiny flat scales. They weaken plants quickly and transmit viruses. Yellow sticky cards catch adults; neem oil or insecticidal soap targets nymphs.
Thrips rasp leaf surfaces, leaving silver streaks or distorted growth. They are tiny (under 2mm) and fast-moving. Flower petals show brown edges. Blue sticky cards catch thrips better than yellow ones.
Spider mites thrive in hot, dry conditions. Fine webbing on stems and leaf undersides is the giveaway. Leaves turn stippled or bronze. Raise humidity and apply predatory mites (Phytoseiulus persimilis) or neem oil.
Fungus gnats are more of a seedling problem than a foliage one. Adults are weak fliers near the soil; larvae feed on roots and organic matter in wet growing media. Let the top inch of soil dry between waterings and use yellow sticky cards near the soil surface.
Mealybugs look like small tufts of white cotton, usually in leaf axils and stem joints. They move slowly and are easy to miss until populations are large. Rubbing alcohol on a cotton swab removes small colonies; insecticidal soap handles larger ones.
Slugs and snails leave irregular holes in leaves and a silvery slime trail. They feed at night and hide under pots and debris during the day. Iron phosphate bait is the safest option around children and pets, and home gardeners rate it highly alongside handpicking.
Pro Tip for ID: Hold your phone camera steady and use the macro mode to photograph the pest on the leaf. Get the underside of the leaf in the frame. A clear photo lets you cross-reference with university extension ID keys in minutes.
| Pest | Key signs | Where to look | Fastest first-line action |
|---|---|---|---|
| Aphids | Honeydew, sooty mold, curled leaves | New growth, leaf undersides | Water blast + insecticidal soap |
| Whiteflies | White cloud when disturbed, flat nymphs | Leaf undersides | Yellow sticky cards + neem oil |
| Thrips | Silver streaks, distorted flowers | Flowers, leaf surfaces | Blue sticky cards + insecticidal soap |
| Spider mites | Fine webbing, stippled leaves | Leaf undersides, stems | Raise humidity + predatory mites |
| Fungus gnats | Weak fliers near soil, wilting seedlings | Soil surface, roots | Dry out soil + yellow sticky cards |
| Mealybugs | White cottony clusters | Leaf axils, stem joints | Rubbing alcohol + insecticidal soap |
| Slugs/snails | Irregular holes, slime trails | Under pots, debris, at night | Handpick + iron phosphate bait |
How to keep pests out: greenhouse design, sanitation, and quarantine
Prevention is where you get the best return on your time. A well-sealed greenhouse with a consistent sanitation routine will have fewer pest problems than one that relies on sprays to clean up after every outbreak.
Design and exclusion
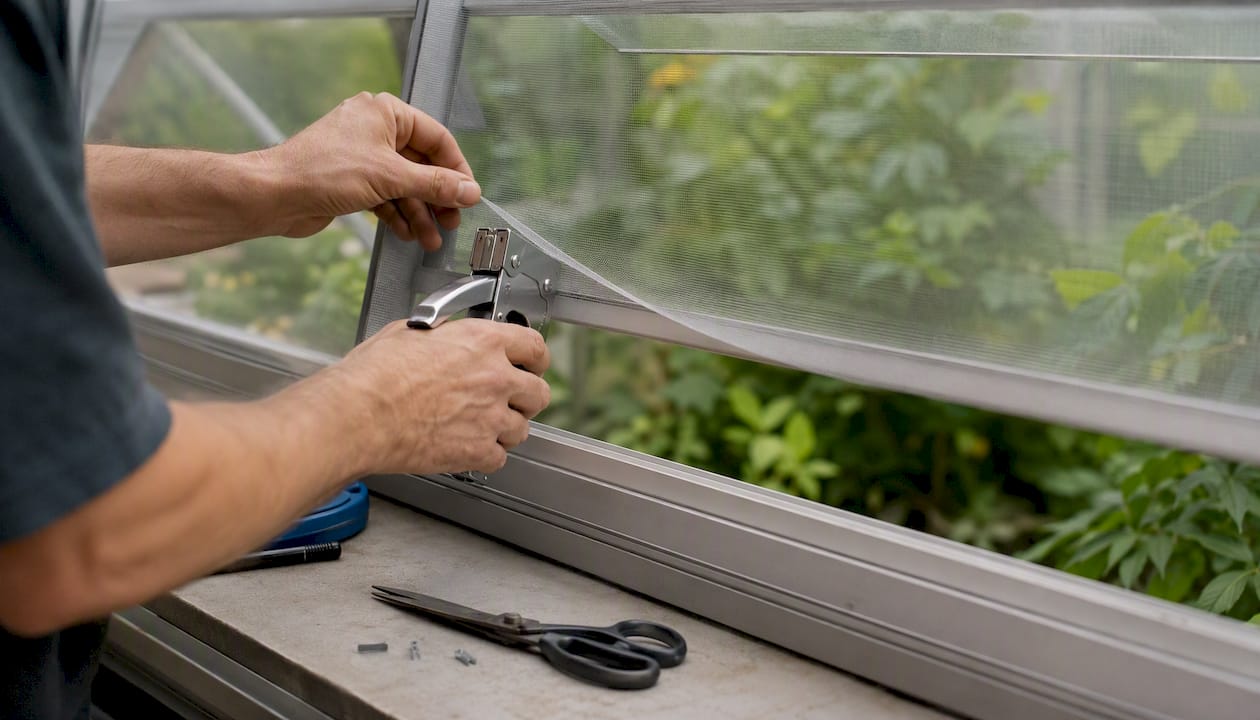
Insect screening on vents and louvers is your first physical barrier. For flying pests like whiteflies and thrips, a mesh of 50 mesh (about 0.3mm opening) blocks most adults. Aphids need a finer 80-mesh screen. The tradeoff is airflow: fine mesh reduces ventilation by 30–50%, so greenhouse design choices should account for extra vent area or a small circulation fan to compensate. Double-door airlocks or a simple vestibule at the main entrance dramatically cut the number of insects that drift in when you walk through. According to MSU’s greenhouse pest management guidance, exclusion and quarantine of new plant material are the primary defenses because greenhouses create near-ideal conditions for pest reproduction.
Sanitation checklist
Daily:
- Remove dead or yellowing leaves immediately.
- Empty and clean drainage trays to prevent standing water (fungus gnat breeding ground).
Weekly:
- Wipe down bench surfaces with a dilute bleach solution (1:9 bleach to water) or a quaternary ammonium cleaner.
- Clear any weeds growing inside or just outside the greenhouse.
- Check sticky cards and replace them if they are heavily covered.
Monthly:
- Remove all plant debris from under benches.
- Inspect structural joints, corners, and glazing seals for algae or organic buildup where pests overwinter.
- Check irrigation lines for leaks that keep soil perpetually wet.
Quarantine protocol
Treat every new plant as a potential pest carrier. Greenhouse managers call new arrivals “Trojan horses,” and the label fits. Set up a separate quarantine zone, ideally outside the main greenhouse or in a physically separated section, and hold new plants there for two weeks minimum. During quarantine, inspect them twice with a hand lens and place a sticky card nearby. Only move a plant into the main space after two clean inspections.
Pro Tip: Use color-coded trays and dedicated tools for your quarantine area. Never bring a trowel or watering can from quarantine into the main greenhouse without washing it. Pest eggs and crawlers transfer on tools just as easily as on plant tissue.
How to monitor like a pro: sticky cards, inspections, and thresholds
Early detection is what separates a minor pest problem from a full-blown infestation. University of Massachusetts extension guidance recommends weekly monitoring as the baseline for any greenhouse, regardless of size.
Here is a practical scouting routine:
- Place sticky cards at two heights: canopy level (to catch flying adults like whiteflies and fungus gnat adults) and near the pot rim or soil surface (to catch fungus gnats emerging from the growing medium). For a home greenhouse under 500 sq ft, two to four cards placed at different spots give you a reasonable picture.
- Check cards every seven days. Count the insects on each card and note the date. You do not need a spreadsheet; a small notebook or a phone note works fine.
- Walk every row with a hand lens (10x magnification is enough). Flip leaves on at least 10% of your plants, focusing on new growth and leaf undersides. Look for eggs, crawlers, and feeding damage.
- Set a simple action threshold. A useful starting point: more than five whiteflies per card per week on a single card means you should investigate that zone closely and consider a targeted treatment. More than 10 fungus gnat adults per card per week suggests the soil moisture management needs adjustment. These are not hard rules, but they give you a trigger point rather than waiting until you can see the problem from across the room.
- Record your counts. Date, card location, pest type, and count. A short note after any treatment (“applied insecticidal soap to bench 2, whitefly adults”) takes 30 seconds and becomes genuinely useful data by the following season.
IPM for greenhouses treats routine scouting and recordkeeping as central, not optional, because the data you collect is what lets you set realistic thresholds and catch outbreaks before they require heavy intervention.
Biological controls and organic products that actually work in greenhouses
Biologicals and biopesticides work best when pest populations are low and you start them early. Waiting until you have a visible outbreak before ordering beneficial insects is the most common mistake home growers make with biocontrol.
Beneficial insects and organisms
- Predatory mites (Phytoseiulus persimilis, Neoseiulus californicus): Target spider mites specifically. Release when mite populations are first detected. They need moderate humidity (above 60%) to establish.
- Lady beetles (Hippodamia convergens): Generalist predators that eat aphids, mealybugs, and small soft-bodied insects. Most effective when released in a closed greenhouse at dusk.
- Parasitic wasps (Encarsia formosa, Aphidius colemani): Encarsia parasitizes whitefly nymphs; Aphidius targets aphids. Both are tiny, harmless to humans, and highly effective at low pest densities.
- Entomopathogenic nematodes (Steinernema feltiae): Applied as a soil drench, they target fungus gnat larvae in the root zone. Keep soil moist after application for 48 hours to help nematodes move through the medium.
- Bacillus thuringiensis (Bt): A soil bacterium that produces proteins toxic to caterpillar larvae when ingested. Apply to foliage; larvae must eat treated tissue to be affected. Bt var. israelensis (Bti) targets fungus gnat larvae as a soil drench.
Organic spray products
- Neem oil: Disrupts insect growth and acts as a repellent. Effective against aphids, whiteflies, thrips, and mites. Apply in the evening to avoid phytotoxicity on stressed plants and to reduce impact on pollinators.
- Insecticidal soap: Contact-kill for soft-bodied insects (aphids, mealybugs, spider mites, whitefly nymphs). Coverage of leaf undersides is critical. No residual activity, so repeat applications every 5–7 days.
- Diatomaceous earth (food-grade): Dust applied to soil surfaces and around pot bases. Damages the exoskeleton of crawling insects (fungus gnats, slugs). Loses effectiveness when wet.
- Iron phosphate slug bait: Breaks down into iron and phosphate in the soil, making it safe around children, pets, and wildlife. Highly rated by home gardeners for slug and snail control.
Compatibility: what harms your beneficials
University of Florida entomology experts caution that “natural” sprays can still kill beneficial insects and should be treated as last-resort tools within an IPM program.
Pro Tip: When you order beneficial insects, pause sticky cards in the release zone for 48–72 hours. Sticky cards do not distinguish between pests and beneficials. Resume cards after the beneficials have dispersed. Also, order from a supplier that ships with cold packs and provides storage instructions; biopesticides and live insects killed by a hot mailbox are a waste of money.
Mechanical and cultural tactics you can do today
Cultural and mechanical controls are the foundation of any pest management approach, not a fallback. They reduce pest pressure without any chemical input and make every other tactic more effective.
- Handpicking: Slow but surprisingly effective for mealybugs, caterpillars, slugs, and snails. Do it at night for slugs. A survey of roughly 1,300 North American gardeners found handpicking among the top-rated pest control methods for home growers.
- Yellow and blue sticky traps: Yellow cards attract whiteflies, aphids, and fungus gnats. Blue cards attract thrips. Position them at canopy height for flying adults. Replace when more than 25% covered.
- Row covers and insect netting: Lightweight floating row covers (1.5 oz/sq yd) placed over seedling trays block most flying insects without significantly raising temperature. Remove during pollination when growing fruiting crops.
- Soil surface management: A thin layer of coarse sand or perlite on top of growing media deters fungus gnat egg-laying. Letting the top inch of soil dry between waterings cuts larval survival dramatically.
- Pruning and spacing: Dense canopies trap humidity and create ideal conditions for spider mites and botrytis. Remove crowded stems, lower leaves touching the soil, and any plant material showing early disease symptoms.
- Drainage fixes: Standing water in trays and poor drainage in pots are the two biggest contributors to fungus gnat problems. Elevate pots on wire mesh benches and empty trays within an hour of watering.
- Slug and snail barriers: Copper tape around pot rims creates a mild electrical deterrent. Diatomaceous earth around pot bases works when dry. Iron phosphate bait placed in shallow containers near slug activity is effective and safe around pets and children.
When combining these tactics with biologicals, apply mechanical controls first to knock down the pest population, then release beneficials into a lower-pressure environment where they can establish.
When to use conventional pesticides, how to stay safe, and how to avoid resistance
Use conventional pesticides only after cultural, mechanical, and organic options have failed, or when pest pressure is high enough that waiting will cause significant crop loss. That is not a philosophical position; it is practical. Broad-spectrum pesticides kill beneficial insects, which often leads to secondary pest outbreaks and a longer, more expensive problem.
Safety checklist before you spray
- Read the entire label before opening the container. The label is a legal document, and applying a product in a way not listed on the label is a violation.
- Wear the PPE the label specifies: at minimum, chemical-resistant gloves and eye protection. Many greenhouse insecticides require a long-sleeved shirt and closed-toe shoes.
- Observe the Restricted Entry Interval (REI): the time you must stay out of the treated area after application. REIs range from 4 hours to several days depending on the product.
- Observe the Pre-Harvest Interval (PHI) for any edible crop: the minimum number of days between the last application and harvest. UT Extension’s greenhouse pest guidance includes a table of pesticides labeled for greenhouse use with their REI and PHI values.
- Ventilate the greenhouse during and after application. Pesticide vapors concentrate in enclosed spaces.
- Store all pesticides in their original containers, locked away from children.
Resistance management
- Rotate modes of action (MoA). If you use a pyrethroid one application, switch to a different MoA class (e.g., a neonicotinoid or a spirotetramat) for the next. Repeated use of the same MoA is the fastest route to resistance.
- Keep records of every product applied: date, product name, MoA group, rate, and target pest. This is the only way to track rotation.
- Avoid applying the same product more than twice per season against the same pest population.
- Confirm the product is labeled for the specific pest and crop before purchase. Off-label use is illegal and can cause crop damage.
Pro Tip: Before spraying a new product across your entire greenhouse, apply it to three or four plants and wait 48 hours. Some plants, especially under heat stress or with soft new growth, show phytotoxic responses (bleaching, tip burn, leaf drop) to products that are technically labeled for them. Catching that on four plants beats losing a bench.
A step-by-step response plan for when you discover pests
Isolate the affected plant immediately. That single action buys you time to think and stops the problem from spreading while you work through the rest of the plan.
- Move the affected plant to your quarantine area or outside the greenhouse entirely. If the plant is too large to move, create a physical barrier (a row cover draped over it) to limit pest movement.
- Photograph the pest and collect a specimen in a sealed plastic bag. Cross-reference with a university extension ID key (UC IPM’s pest identification resources are a reliable starting point).
- Inspect all neighboring plants within a 3-foot radius. Check leaf undersides, stem joints, and the soil surface. Note which plants show damage and which appear clean.
-
Choose your intervention based on pest pressure:
- Low pressure (isolated plant, early infestation): Cultural fix + targeted organic spray (insecticidal soap, neem oil) or beneficial release.
- Medium pressure (multiple plants, moderate populations): Targeted organic sprays applied to all affected plants, plus a beneficial insect release if appropriate.
- High pressure (widespread outbreak): Spot-apply a conventional pesticide to the affected zone, then follow up with cultural fixes and a biocontrol program once populations drop.
- Label your records. Write down the date, pest identified, plants affected, and treatment applied.
- Set a follow-up date. Return in 5–7 days to rescount sticky cards and inspect treated plants. If populations are not declining, escalate to the next intervention level.
The decision logic here mirrors what South Dakota State University Extension describes as the core IPM cycle: identify, monitor, set thresholds, choose management options, and evaluate results.
When pests are most likely to strike: growth stages and seasonal timing
Seedlings and dense flowering canopies are the two highest-risk stages in any greenhouse. Seedlings lack the leaf mass to tolerate feeding damage, and flowering canopies create warm, humid microclimates that spider mites and thrips exploit.
- Spring: The highest-risk period for introductions. New plant shipments arrive, windows open more often, and outdoor pest populations are building. Enforce quarantine strictly. Consider releasing Aphidius wasps and Encarsia preventively if you had aphid or whitefly problems the previous year.
- Summer: Heat and low humidity favor spider mites. Keep ventilation high and humidity above 50% where possible. Monitor mite populations weekly. Fungus gnats slow down in summer if you manage irrigation carefully.
- Fall: Clean-up season. Remove all spent plant material, scrub benches, and treat the soil with Bti if fungus gnats were a problem. This is the best time to break pest cycles before they overwinter.
- Winter: Reduced pest activity, but overwintering mites and aphid eggs survive on plant debris and in soil. Sanitize thoroughly before bringing in spring seedlings. Inspect any plants that stayed in the greenhouse over winter before placing new plants near them.
| Stage/Season | Main pest risks | Recommended actions |
|---|---|---|
| Seedlings (any season) | Fungus gnats, aphids, damping-off | Dry soil surface, sticky cards at soil level, Bti drench |
| Flowering/fruiting | Spider mites, thrips, whiteflies | Increase ventilation, release predatory mites, blue sticky cards |
| Spring | Aphids, whiteflies, thrips (introductions) | Strict quarantine, preventive beneficial releases |
| Summer | Spider mites, thrips | Humidity management, weekly mite scouting |
| Fall | Fungus gnats, overwintering pests | Full sanitation, Bti soil drench, bench scrub |
| Winter | Overwintering mites, aphid eggs | Remove all debris, inspect overwintered plants before mixing |
How to choose reliable biologicals, monitoring tools, and safe spray products
The best supplier is the one who tells you exactly how to store the product, what pests it targets, and what its mode of action is. If a supplier cannot answer those three questions clearly, find another one.
Shopping checklist
- Label claims: Confirm the product lists your specific pest and your crop type. A product labeled for “ornamentals” may not be cleared for edible crops.
- Mode of action (MoA): Know the MoA group before you buy. This matters for resistance rotation and for compatibility with beneficials.
- Storage and stability: Beneficial insects and microbial products (Bt, nematodes) have short shelf lives and specific temperature requirements. A nematode product that sat in a warm warehouse is worthless.
- Guaranteed release rates: For beneficial insects, the supplier should state the number of live organisms per unit and the recommended release rate per square foot.
- Shipping conditions: Live beneficials should ship with cold packs and arrive within 2–3 days. Reject any shipment that arrives warm or with dead product.
- Return or replacement policy: Reputable suppliers replace dead-on-arrival beneficial insect orders.
Questions to ask suppliers
- What is the recommended storage temperature and shelf life after opening?
- Is this product compatible with [specific spray you use]?
- What is the recommended release schedule for my greenhouse size?
- Does this product have a PHI for edible crops?
Basic home greenhouse toolkit
- Yellow and blue sticky cards (buy in packs of 25 or more)
- 10x hand lens or jeweler’s loupe
- 50-mesh or 80-mesh insect screening for vent covers
- Insecticidal soap concentrate (ready-to-mix)
- Neem oil concentrate
- Bt concentrate (for caterpillars) and Bti (for fungus gnats)
- Iron phosphate slug bait
- Diatomaceous earth (food-grade)
- A notebook or phone app for scouting records
Gridwiseliving’s greenhouse collection is a practical starting point for growers looking at structures built with ventilation and pest exclusion in mind. For eco-friendly pest control options and when you want a professional perspective on harder-to-manage infestations, Bradford Pest Control’s eco-friendly guidance covers contractor-level approaches worth knowing about.
Pest life cycles and why timing your controls around them matters
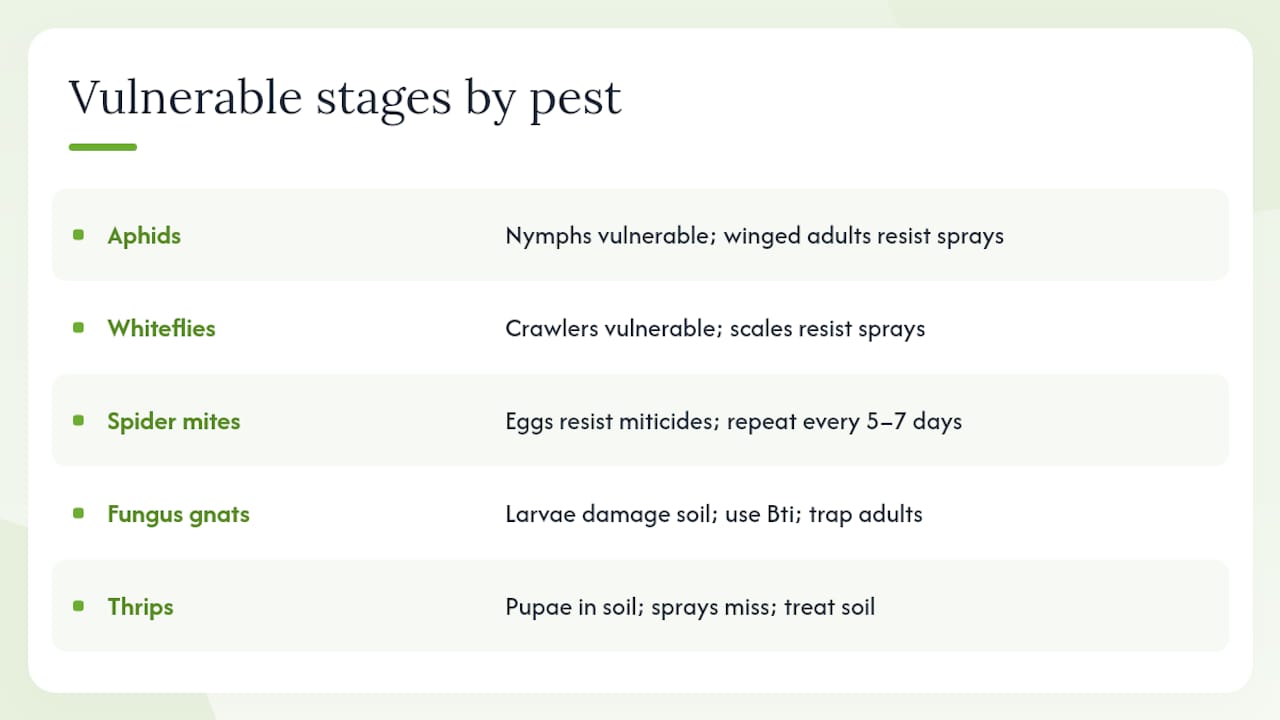
Knowing when a pest is most vulnerable is what separates a treatment that works from one that does not. Most greenhouse pests have a life stage that is nearly impossible to kill with sprays, which is why timing matters more than product choice in many cases.
Aphids reproduce parthenogenetically (without mating) in warm greenhouses, meaning a single female can produce dozens of live nymphs per week. Nymphs are the most vulnerable stage. Insecticidal soap and neem oil work on nymphs and soft-bodied adults but do nothing to winged adults that have already dispersed.
Whiteflies have four nymph stages plus an adult. Only the first two nymph stages (crawlers) move; stages three and four are sessile scales attached to the leaf. Insecticidal soap and neem oil kill crawlers and adults on contact but do not penetrate the scale stage. Encarsia formosa parasitizes the scale stage, which is why it works when sprays plateau.
Spider mites complete a generation in as little as 7 days at 80°F. Eggs are not affected by most miticides. This is why a single application rarely solves a mite problem; you need two or three applications spaced 5–7 days apart to catch newly hatched nymphs before they mature and lay more eggs.
Fungus gnats have a four-stage life cycle: egg, four larval instars, pupa, and adult. Larvae live in the top 2 inches of soil and do the damage. Adults are mostly a nuisance and an indicator. Bti targets larvae in the soil; sticky cards catch adults. Targeting both simultaneously breaks the cycle faster than either alone.
Thrips pupate in the soil, not on the plant. This is a critical detail: spraying foliage kills adults and nymphs on the plant, but pupae in the soil survive and emerge as new adults within days. Combining foliar sprays with a soil drench (nematodes or Bti) or a soil surface treatment (diatomaceous earth) addresses both phases.
Diseases that often follow pest damage in greenhouses
Pest damage and disease rarely travel alone. The wounds and stress that pests create open doors for pathogens that would otherwise struggle to establish.
Botrytis (gray mold) is the most common disease in home greenhouses. It thrives in the same humid, crowded conditions that spider mites and thrips prefer. Thrips feeding wounds are a direct entry point for botrytis spores. Improve air circulation, remove damaged tissue promptly, and avoid overhead watering late in the day.
Powdery mildew follows aphid infestations on cucurbits and ornamentals. Aphid feeding weakens plant tissue and disrupts the waxy cuticle, making leaves more susceptible. Neem oil applied for aphid control also has antifungal properties that suppress early powdery mildew.
Sooty mold grows on the honeydew that aphids, whiteflies, and mealybugs excrete. It does not infect plant tissue directly but blocks light and reduces photosynthesis. Controlling the pest eliminates the food source for sooty mold, which then dries and flakes off on its own.
Damping-off (caused by Pythium and Rhizoctonia species) kills seedlings at the soil line. Fungus gnat larvae damage roots and create entry points for these pathogens. The combination of wet soil, root feeding, and pathogen pressure is why fungus gnat infestations in seedling trays are so destructive. Reducing soil moisture and applying Bti breaks the cycle before damping-off takes hold.
Bacterial soft rot can follow slug and snail feeding on succulent stems and fruit. The slime trail itself carries bacteria. Remove damaged tissue and treat slug populations before they reach fruiting crops.
How to choose between organic and conventional controls based on pest pressure and crop type
The decision is not ideological. It comes down to three variables: how bad the infestation is right now, what crop is at risk, and how much time you have before damage becomes irreversible.
Use organic and biological controls when:
- The infestation is early or localized (one or two plants affected).
- You are growing edible crops and want to minimize chemical residues.
- You have beneficial insects established or recently released.
- The pest is a species that biologicals handle well (whiteflies, aphids, spider mites, fungus gnat larvae).
- You have 1–2 weeks before the pest pressure becomes critical.
Use conventional pesticides when:
- The infestation is widespread and populations are high enough that biologicals cannot catch up.
- The crop is at a vulnerable stage (seedlings, early fruit set) where even moderate feeding will cause irreversible damage.
- You have tried two rounds of organic sprays with no measurable reduction in pest counts.
- The pest is a species with limited biological control options in a home greenhouse setting (some thrips populations, certain mite species resistant to predatory mites).
Crop type matters. Ornamentals give you more flexibility with pesticide choice and PHI is irrelevant. Edible crops narrow your options significantly: many conventional pesticides are not labeled for food crops, and PHI compliance is non-negotiable. For edibles, lean hard on cultural controls, biologicals, and the handful of pesticides (spinosad, pyrethrin with short PHI, insecticidal soap) that are cleared for food use.
The Missouri University Extension IPM guide frames this as a hierarchy: cultural and physical controls first, then biological, then chemical as a last resort. That order is not arbitrary; it reflects which options preserve the most options for the next intervention.
What to do after treatment: follow-up monitoring and evaluation
A treatment is not finished when you put the spray bottle down. The follow-up inspection is where you find out whether it worked and what to do next.
Five to seven days after treatment:
- Recount sticky cards in the treated zone. Compare to the pre-treatment count. A 50% or greater reduction in adult counts suggests the treatment is working.
- Inspect treated plants with a hand lens. Look for live insects, new feeding damage, and eggs. New feeding damage on previously treated leaves means the population survived or reinvaded.
- Check neighboring plants that were not treated. If pest counts are rising there, the population has spread and the treatment zone needs to expand.
If populations are not declining after two treatment cycles:
- Reconsider your ID. Misidentification is common, and the wrong product for the wrong pest will never work.
- Check your application method. Insecticidal soap and neem oil require thorough coverage of leaf undersides. A product applied only to the top of the canopy will miss most of the population.
- Consider escalating to the next level of the IPM hierarchy.
After a successful knockdown:
- Continue weekly scouting for at least four weeks. Pest populations can rebound from eggs and pupae that survived the treatment.
- If you used a conventional pesticide, do not apply the same MoA class again for the rest of the season. Switch to a biological or a different chemical class.
- Record the outcome: what worked, what did not, and what you would do differently. This is the data that makes next season easier.
Recordkeeping best practices for pest control interventions
A short recordkeeping habit materially improves your decisions in subsequent seasons. UMass Extension guidance supports this directly: tracking sticky card counts and treatment outcomes helps home growers set realistic action thresholds over time.
You do not need software. A dedicated notebook or a simple phone note with consistent entries is enough. Record these five things every time:
- Date and location (which bench, which zone of the greenhouse).
- Pest identified and the life stage observed (adults, nymphs, eggs).
- Sticky card counts for that week at each card location.
- Treatment applied: product name, rate, and method of application.
- Outcome note (written at the follow-up inspection): population up, down, or stable.
At the end of each season, spend 15 minutes reviewing your notes. Look for patterns: which pests appeared first, which treatments worked, and which months had the highest pressure. That review is what lets you shift from reactive to preventive, ordering beneficial insects before the pest arrives rather than after.
For growers who want a more structured approach, NPIC (National Pesticide Information Center) provides guidance on pesticide label interpretation and safety documentation that can inform how you log chemical applications.
Why IPM-first is the only approach that actually holds up over time
The most common mistake home greenhouse growers make is treating pest control as a series of emergencies rather than a system. You see a whitefly, you spray. The spray kills the whiteflies and the parasitic wasps you did not know you had. Three weeks later, the whiteflies are back, the wasps are gone, and you are spraying again. That cycle is expensive, exhausting, and entirely avoidable.
IPM breaks the cycle by making prevention and monitoring the primary work, not the afterthought. A five-minute weekly walk with a hand lens and a glance at your sticky cards catches problems when they are still easy to handle. Quarantining new plants costs nothing but two weeks of patience. Releasing Encarsia wasps in April, before whitefly populations build, costs a few dollars and works quietly in the background for weeks.
The growers who get the best results are not the ones with the most products on their shelf. They are the ones who know their greenhouse well enough to notice when something is off before it becomes a crisis. That knowledge comes from consistent monitoring and honest recordkeeping, not from any single product.
One habit worth adopting this season: every Monday, check your sticky cards and spend five minutes scanning plants in the zone with the highest historical pest pressure. Write down what you see. That is the whole system in its simplest form, and it works.
Gridwiseliving’s year-round greenhouse growing guide covers how production choices and seasonal planning interact with pest risk, which is worth reading alongside this.
Ready to grow in a greenhouse built for pest prevention?

A well-designed greenhouse with proper ventilation, screened vents, and a tight door seal is the single best structural investment you can make in pest prevention. Gridwiseliving’s greenhouse collection includes structures built with these features in mind, from compact backyard models to larger polycarbonate greenhouses with roof vents and swing doors. When your structure works with your IPM program instead of against it, every other pest control step gets easier.
Sources
- Using Integrated Pest Management in Greenhouses and Herbaceous Nurseries | MU Extension
- Pest Management in Retail Greenhouses
- Eco-Friendly Pest Control: 3 Natural Solutions That Really Work | Entomology and Nematology Online| University of Florida Entomology and Nematology Online Programs
- Organic Pest Control Methods