

7 Day Routine to Diagnose Seed Germination Problems for Home Growers
Most seed germination problems trace back to one of five culprits: moisture extremes, wrong soil temperature, poor sowing depth or light exposure, old seeds, or disease. Before you resow anything, run a quick paper-towel germination test and check your soil temperature and moisture with a simple thermometer. That single step tells you whether the problem is the seed or the setup.
TL;DR:
- Maintaining consistent soil moisture without overwatering or underwatering prevents fungal diseases and seed rot during germination.
- Ensuring soil temperature stays between 70 and 75°F is critical, especially when outdoor conditions or unregulated heat mats can cause stalls.
- Planting seeds at the correct depth or surface sowing, depending on light needs, influences successful emergence and healthy growth.
- Testing seed viability with a paper-towel method and storing seeds properly extends their shelf life and reduces failed germination.
- Using a greenhouse or controlled environment minimizes temperature and humidity swings that commonly cause damping-off and seedling collapse.
Table of Contents
- Common Seed Germination Problems Tied to Watering
- What Soil Temperature Do Seeds Need to Germinate?
- How Deep Should You Plant Seeds, and Do They Need Light?
- How Old Is Too Old? Testing Seed Viability
- Why Are My Seedlings Collapsing? Damping-Off Explained
- Why Aren’t My Outdoor Seeds Coming Up?
- A 7-Day Troubleshooting Routine for Failed Seeds
- Your Prevention Checklist for Reliable Seed Starts
- Gridwise Methods for Testing and Storing Seeds
- Habits That Save a Season
- Give Your Seeds a More Stable Start
- Sources
- FAQ
Common Seed Germination Problems Tied to Watering
Seeds need media that’s evenly damp, not soaked. Saturated soil pushes out the oxygen a germinating seed needs and creates the exact wet, stagnant conditions that invite fungal pathogens. Bone-dry soil kills the process just as fast, since the seed coat needs continuous moisture to trigger the enzymes that start growth.
A few methods keep moisture steady without guesswork:
- Water from the bottom by setting trays in a shallow pan so the mix wicks up what it needs.
- Mist the surface lightly instead of drenching from above, especially with fine seed.
- Lift the tray to judge weight. A dry tray feels noticeably lighter than a properly moist one.
- Use a clear humidity dome to hold moisture while seeds are dormant, then remove it the moment germination begins to prevent rot.
If nothing has emerged and the soil feels dry, that’s usually an underwatering problem. If seeds look swollen, discolored, or slimy, you’re dealing with rot from too much water.
Pro Tip: Check moisture at the tray’s center and its edges separately. Edges dry out first, so a tray that looks fine at a glance can already be bone dry where the roots are trying to grow.
What Soil Temperature Do Seeds Need to Germinate?
Most vegetable and flower seeds germinate best between 70 and 75°F, measured in the soil itself, not the surrounding air. Cool-season crops like lettuce and spinach tolerate cooler soil, while warm-season plants like peppers and tomatoes stall out completely below 65°F.
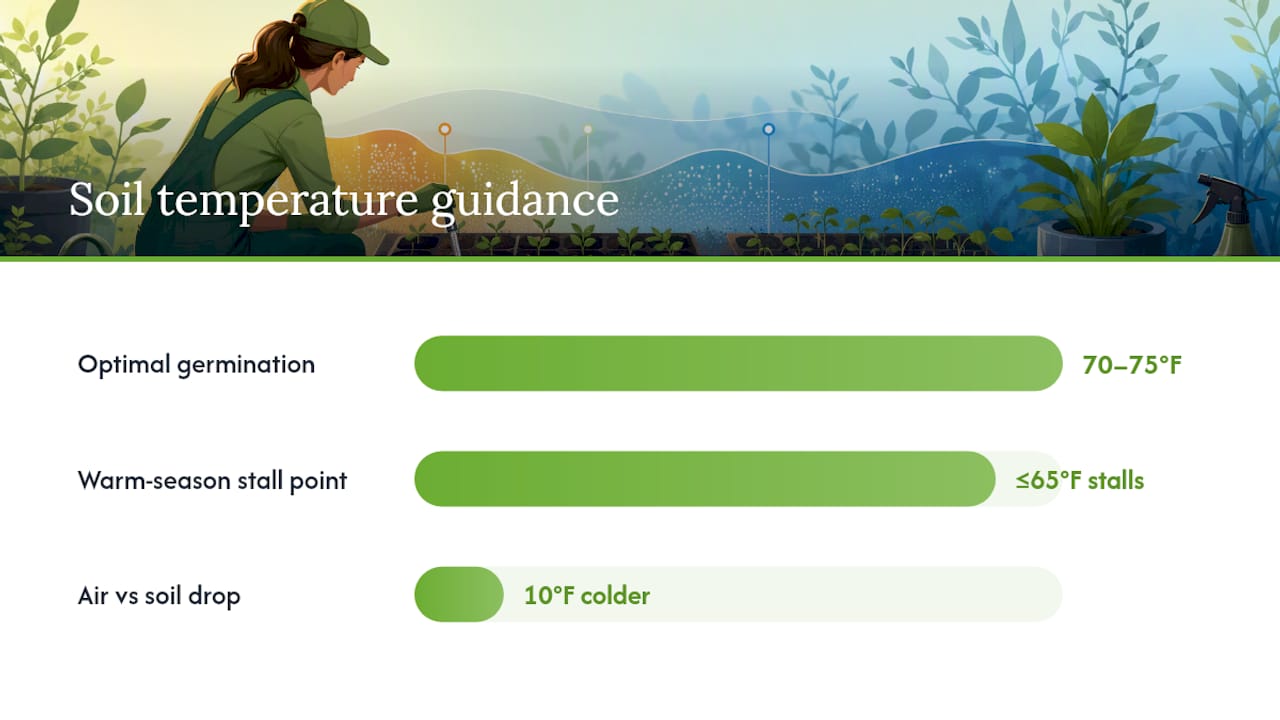
Measuring air temperature instead of soil temperature is the most common mistake gardeners make here. A room can read a comfortable 72°F while the soil in an uninsulated tray near a drafty window sits ten degrees colder.
To get this right:
- Insert a soil thermometer probe about an inch deep, near the seed, not the tray’s edge.
- Use a heat mat paired with a thermostat rather than running it unregulated, which risks cooking roots.
- Check the reading at different times of day, since a mat under a cold windowsill behaves differently than one on a warm counter.
Statistic Callout: Seeds germinating outside that 70–75°F range often stall for weeks even when moisture is perfect, according to UW-Madison Extension horticulture research. Temperature is often the invisible variable gardeners overlook while they fuss over watering schedules.
How Deep Should You Plant Seeds, and Do They Need Light?
A rough rule works for most seeds: plant at a depth roughly twice the seed’s diameter. Bury a seed too deep and it exhausts its stored energy before the stem breaks the surface. Bury it too shallow, or fail to press it in at all, and it dries out before roots form.
Some seeds break that rule entirely, because they need light, not darkness, to germinate. Iowa State Extension notes that photoblastic seeds should be surface sown or barely covered rather than buried.
- Lettuce, basil, and many flowering annuals need light exposure to trigger germination.
- Larger seeds like squash, beans, and corn prefer darkness and a deeper hole.
- Petunias and snapdragons also fall into the light-needed category, which surprises a lot of first-time growers.
Once seedlings emerge, get them under strong light within a day or two. Insufficient light after emergence is the single most common cause of tall, pale, leggy seedlings that flop over and never recover well.
How Old Is Too Old? Testing Seed Viability
Seed packets don’t expire the moment the date passes, but viability drops steadily with age and poor storage. Most vegetable seeds stay viable for three to five years when kept cool and dry, though onions and parsnips fade faster, while tomatoes and beans can last well beyond that window if stored properly.
- Place ten seeds on a damp paper towel, roll it loosely, and seal it in a bag with a few air holes.
- Store the bag somewhere warm, around 70°F, and check daily starting on day five.
- Count how many seeds have sprouted by day ten to get your germination percentage.
- Below 50 percent, plan to sow more thickly or replace the lot. Above 70 percent, the seeds are fine.
Some seeds won’t sprout under any conditions until their dormancy is broken. Many native and wild species need cold-moist stratification (a few weeks in a damp, refrigerated bag) or scarification, which means nicking or sanding a hard seed coat so water can get in.
Pro Tip: Gridwiseliving’s guide to testing seed viability at home walks through this same process with photos showing what a healthy versus failed test looks like.
Why Are My Seedlings Collapsing? Damping-Off Explained
Damping-off is the disease responsible for seeds that rot before they emerge, or seedlings that snap over at the soil line within days of sprouting. It’s caused by water-mold pathogens including Pythium, Phytophthora, and Rhizoctonia, all of which need free water in the seed zone to infect roots and stems.
Watch for these warning signs:
- Seeds that never emerge but feel soft or mushy when dug up.
- Seedlings that look fine one day and are collapsed and wet-stemmed the next.
- Media with a glossy, slimy sheen on the surface.
- Fungus gnats hovering around trays, a sign of consistently overwet soil.
Cool temperatures, stagnant air, and soggy media create the exact environment these pathogens thrive in. Prevention comes down to sanitation: use sterile, soilless seed-starting mix every time, and disinfect any reused pots or trays in a solution of one part chlorine bleach to nine parts water. Avoid overcrowding trays, and run a small fan nearby to keep air moving. That airflow alone can cut disease pressure dramatically, since these pathogens depend on still, humid pockets to spread.
Why Aren’t My Outdoor Seeds Coming Up?
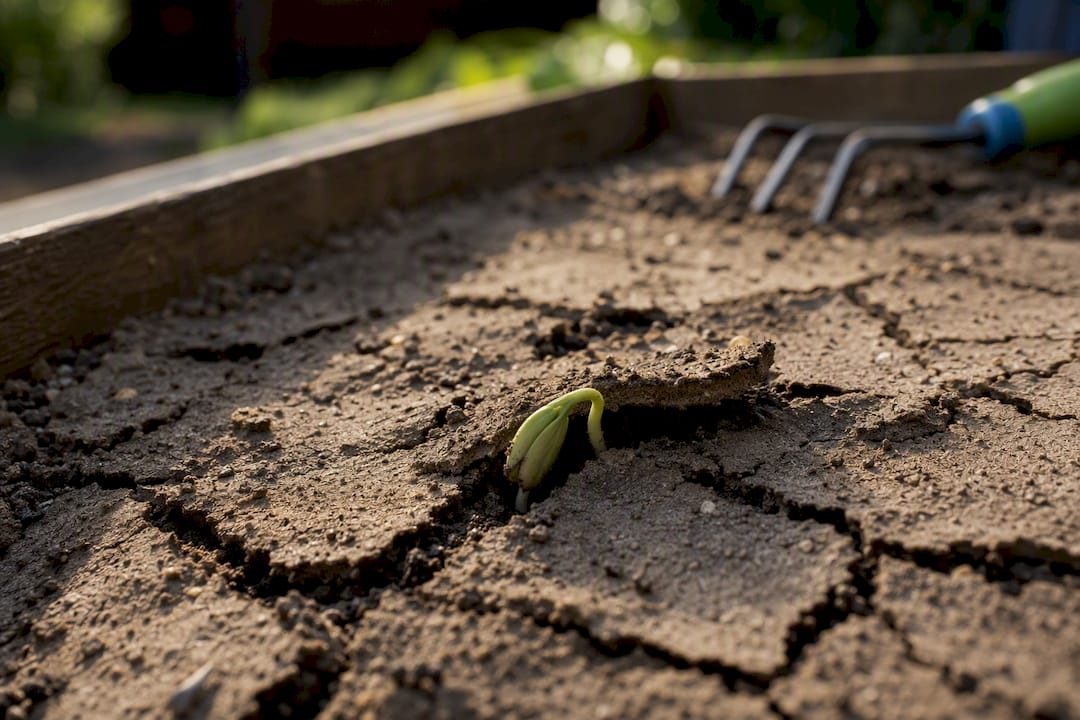
Direct-sown seeds face a different set of obstacles than anything started indoors. A hard rain followed by sun can bake the soil surface into a crust that a delicate seedling simply can’t push through, even when the seed itself germinated just fine underground.
Test workability by squeezing a handful of soil. If it forms a dense, sticky ball instead of crumbling, it’s too wet or too compacted to sow into yet. Waterlogged beds after a cold, wet stretch are a signal to wait, not push forward. If drainage is a persistent issue in a particular bed, it’s worth diagnosing the broader yard drainage pattern rather than fighting the same spot every season.
Practical fixes:
- Rake a thin layer of vermiculite or fine compost over crusted soil to break the seal without smothering seeds.
- Switch to raised beds or row covers when a bed drains poorly or floods after storms.
- Watch for missing seeds or disturbed rows, a sign of birds or rodents, and cover with mesh or a cloche.
- After heavy rain, wait a few days before resowing rather than replanting into saturated ground.
A 7-Day Troubleshooting Routine for Failed Seeds
Work through this sequence before you toss a seed packet or blame the soil:
- Check the seed packet’s expected germination window. Some crops simply take longer than others.
- Run a paper-towel germination test on a sample from the same lot to check viability.
- Measure actual soil temperature with a probe thermometer, not the room’s air temperature.
- Dig up one or two seeds from the tray or bed to inspect them directly for rot, swelling, or no change at all.
- Act on what you find: wait longer if timing is normal, resow if the germ test came back weak, or sanitize everything if you see rot.
A germination test result above 70 percent means your setup, not your seed, is the problem. Below 50 percent, sow more heavily or start a fresh lot. Running one tray as a control, sown fresh with a different seed source, is the fastest way to isolate whether the issue is the seed or the environment around it.
Your Prevention Checklist for Reliable Seed Starts
A handful of supplies prevents the majority of germination failures before they start: sterile seed-starting mix, trays with real drainage holes, a soil thermometer, a heat mat with a thermostat, a clear dome, and a small fan for air circulation once seedlings emerge.
- Pre-moisten your mix before sowing so seeds don’t sit in dry pockets waiting for the first watering.
- Sow at the correct depth for that seed type and keep it covered with the dome until you see the first sprout.
- Move trays under strong light the moment the radicle or shoot appears, no exceptions.
- Thin crowded seedlings early rather than letting them compete for light and airflow.
Clean and disinfect any reused trays and pots at the start of every season, even ones that look fine. Starting seeds indoors with this setup in place removes most of the guesswork that causes repeat failures year after year.
Pro Tip: If you’re new to starting seeds, stack the odds in your favor by choosing beginner-friendly varieties first. Some crops forgive small mistakes far more easily than others.
Gridwise Methods for Testing and Storing Seeds
A reliable viability check doesn’t need lab equipment. The paper-towel method described earlier works for nearly every vegetable and flower seed, and running it before a big planting saves both time and tray space.
Storage matters just as much as the test itself. Keep seeds somewhere cool, dry, and free of temperature swings, since heat and humidity are what shorten viability fastest.
- The Bend Test: a viable seed with proper moisture content resists snapping when bent; brittle seeds have often lost too much moisture or aged out.
- The 100 Rule: add the storage temperature in Fahrenheit to the humidity percentage; keep that combined number under 100 for longer shelf life. Gridwiseliving’s guide to seed storage methods covers both in detail.
- A small, controlled growing space, like a greenhouse, reduces the temperature and moisture swings that cause most of the failures covered above.
Habits That Save a Season
The gardeners who stop losing entire trays aren’t doing anything exotic. They label every tray with the sow date and seed lot, run a quick germination test on anything older than a year, and disinfect containers before reusing them instead of after a crop fails.
Treat each season as a small experiment. Keep a simple log of what soil temperature, watering method, and seed source worked, and adjust the next batch based on that record rather than guessing again from scratch. The habit matters more than any single fix.
— Gridwise
Give Your Seeds a More Stable Start
A heat mat and a paper-towel test fix a lot of problems, but they can’t control everything a windowsill or an exposed outdoor bed throws at a seedling. Gridwiseliving’s greenhouse collection gives seeds a space where temperature and humidity swings are far easier to manage than an open bed or a drafty room, which is where most of the moisture and cold-soil problems covered above actually start.

For gardeners scaling up beyond a few trays, the 10x32ft aluminum polycarbonate greenhouse adds roof vents and swing doors for airflow control, which directly addresses the stagnant, humid conditions that feed damping-off. Browse the greenhouse collection, check dimensions against your available space, and get a season started with fewer variables working against you.
Sources
- Damping off and seed-starting tips (UW–Madison Extension horticulture)
- What’s wrong with my seedlings? Troubleshooting seed starting problems (Illinois Extension)
- Poor germination of vegetable seeds (UMD Extension)
FAQ
Why Am I Having Trouble Germinating Seeds?
The most common causes are inconsistent moisture, incorrect soil temperature, planting too deep, and old or improperly stored seeds. Run a paper-towel germination test and check soil temperature with a probe thermometer to narrow down which one applies to you.
Does Hydrogen Peroxide Help Seeds Germinate Faster?
Some gardeners use diluted hydrogen peroxide to help soften hard seed coats or reduce surface mold risk, but it’s not a substitute for correct temperature and moisture. Sanitation methods with documented backing, like the bleach dilution used for cleaning pots, remain the more reliable disease-prevention tool.
Does Vinegar Help Germinate Seeds?
Vinegar is sometimes used informally to weaken tough seed coats before sowing, similar in concept to scarification, but it’s not a standard or well-documented method for most garden vegetables. Mechanical scarification, like nicking or sanding a hard coat, has clearer, more consistent results for dormant seeds.
When Should You Give Up on Seed Germination?
If a seed lot’s germination test comes back below 50 percent, or nothing has emerged well past the timeframe listed on the packet, it’s time to resow with fresh seed rather than keep waiting. A quick test on a sample from the same lot tells you in about ten days whether the seed itself is the problem.