

Bend Test and the 100 Rule: Seed Storage Methods for Gardeners
Dry your seeds until they snap instead of bend, seal them airtight with a desiccant, and store them somewhere cool, dark, and stable. Use the 100 Rule (temperature in °F plus relative humidity in % should stay at or below 100) to judge any spot in your house. Only refrigerate or freeze seeds once they’re fully dry. Do that, and most garden seed will outlast the packet’s printed date by years.
TL;DR:
- Seeds stored in locations with a combined temperature and humidity sum below 100°F and % will last longer, with 50°F and 45% humidity passing the 100 Rule.
- Properly dried seeds will snap when bent and should be kept airtight with desiccants in sealed containers protected from rodents for optimal longevity.
- Freezing seeds requires prior thorough drying and sealing to prevent ice crystal formation and cell damage, with room temperature stabilization before opening is crucial.
- Seeds like tomatoes and lettuce can remain viable for up to six years if stored correctly, while onions and parsnips typically decay after one or two years.
- The best home storage environments are climate-controlled, stable interior spaces such as closets or basements, rather than uninsulated or variable-temperature areas like garages.
Table of Contents
- Drying Seeds and the 100 Rule: How Dry Is Dry Enough?
- Containers and Desiccants That Keep Seeds Dry and Pest Free
- Refrigerators and Freezers: When Cold Storage Is Worth It
- Testing Seed Viability Before You Plant
- Fridge vs. Freezer: Matching the Method to Your Timeline
- Where in the House Should You Actually Store Seeds?
- How Long Do Stored Seeds Actually Stay Viable?
- Gridwise Perspective: A Seasonal Workflow Worth Repeating
- Make Next Season Easier With the Right Storage Setup
- Sources
Drying Seeds and the 100 Rule: How Dry Is Dry Enough?
Most vegetable and flower seeds sold for home gardens are “orthodox” seeds, meaning they tolerate drying and cold without dying. Tomatoes, beans, peppers, squash, and lettuce all fall into this camp. A small group of species, mostly large tree seeds like oaks and walnuts along with many tropical plants, are recalcitrant and die if they dry out. If you’re saving seed from your vegetable garden or flower beds, you’re almost certainly dealing with orthodox types, so the drying rules below apply.
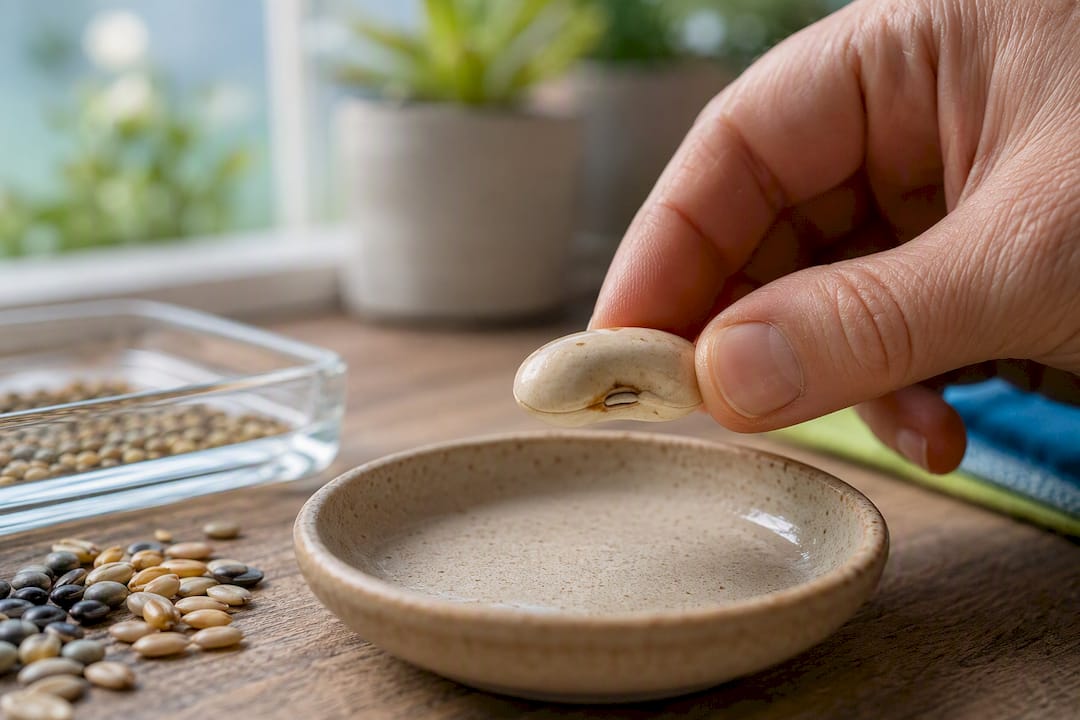
Air-drying on window screens or paper plates for one to three weeks is the simplest method and works for nearly everything. A faster option: spread seeds on a paper towel inside a sealed container with a bag of silica gel for several days, or set them in the refrigerator (not the freezer) to draw out moisture slowly. Some gardeners just leave seed heads or pods in a self-defrosting refrigerator, since that appliance’s design constantly pulls humidity out of the air.
Moisture targets shift depending on how long you plan to keep the seed.
The 100 Rule: Add your storage location’s temperature (°F) to its relative humidity (%). If the total is 100 or less, that spot is acceptable for seed storage — and the lower the number, the longer your seeds will keep. A 70°F closet at 40% humidity totals 110, which fails. A 50°F basement at 45% humidity totals 95, which passes.
Two low-tech checks confirm you’re on track:
- Bend test: A properly dried seed snaps cleanly when bent. If it just folds or flattens, it still holds too much moisture and needs more drying time.
- Humidity indicator strips: These cheap paper strips, sold for camera gear and gun safes, change color at set humidity thresholds and work well tucked into a seed jar.
Containers and Desiccants That Keep Seeds Dry and Pest Free
Glass mason jars with rubber gasket lids are the gold standard for home seed storage. They seal completely, you can see the contents at a glance, and they’re already sitting in most kitchen cabinets. Metal tins with tight lids and heavy plastic storage bins with locking latches work almost as well. Whatever you choose, the goal is the same: no air exchange with the room outside.
Inside that outer container, keep individual varieties in small paper envelopes or coin envelopes rather than tossing loose seed into the jar. This keeps beans from mixing with lettuce and makes inventory checks fast. One quart jar can comfortably hold a dozen or more variety envelopes.
For humidity control, you have a few real options:
- Silica gel packets, reusable and rechargeable by baking them dry in a low oven.
- Powdered milk, wrapped in cheesecloth or a coffee filter, which absorbs moisture and stays effective for roughly six months before it needs replacing.
- Calcium chloride desiccant packets, sold for storage and shipping, which pull moisture harder than silica but need periodic replacement.
Pro Tip: Write the variety name and the year collected directly on the envelope before you seal anything. “Tomato, Brandywine, 2026” takes five seconds and saves you from guessing later when three envelopes of beans look identical.
Rodents love a jar of seed, so store your containers inside a metal tin or a sealed tote rather than an open shelf if mice have ever been an issue in your garage or shed. As for reuse, a seed packet from a garden center works fine as-is if you’ll plant it within a year or two. Once you’re saving your own seed for multi-year storage, repackage into a labeled envelope and move it into an airtight jar with desiccant.
Refrigerators and Freezers: When Cold Storage Is Worth It
A refrigerator set between 32 and 41°F extends most seed life by a few years and works well if you’re storing seed you’ll use within two or three seasons; for cross-discipline tips on cold storage and condensation avoidance applicable to seed refrigeration methods, see Food Preservation: A Safe, Practical Guide for Home Cooks. A freezer at 0°F or colder can preserve seed for considerably longer, but only if the seed is bone dry going in. Wet seed in a freezer forms ice crystals that rupture cell walls and kill the embryo.
Before you freeze anything, follow this sequence:
- Dry the seed using the air-dry or refrigerator method until it passes the bend test.
- Seal it in a bag or jar with a fresh desiccant packet and let it sit for about 72 hours to pull any remaining moisture.
- Transfer to your final airtight container, label it, and place it in the freezer.
- When you take a container out to use, leave it sealed and let it warm to room temperature before opening.
That last step matters more than people expect. Opening a cold jar in a warm kitchen invites humid room air to condense directly onto the seeds, which undoes all your drying work in seconds. Give a frozen jar an hour or two on the counter, still sealed, before you crack the lid.
The most common mistake is freezing seed that “feels dry” but hasn’t actually been tested with the bend test. The second most common mistake is storing in a non-defrosting chest freezer without ever checking for frost buildup, which signals moisture is getting in somewhere.
Testing Seed Viability Before You Plant
A paper towel germination test tells you exactly what percentage of a seed lot will sprout, which matters most for seed sitting in storage more than two or three years. Dampen a paper towel, spread 10 seeds across it, fold it, and seal it in a plastic bag somewhere warm. Check after the number of days typical for that species (a seed packet or extension chart will list it), and count how many sprouted.
- Ten seeds germinate: quick math gives you percent viability directly. Six sprouted out of ten means 60% germination.
- Below 50%, plan to sow roughly twice as thickly as usual to get a full stand.
- Below 20%, it’s usually not worth the bed space. Buy fresh seed instead.
If a stored batch looks discolored, smells musty, or shows tiny holes, that’s mold or insect damage, not something a germination test will fix. Discard moldy seed outright. For insect damage, isolate the batch and inspect neighboring envelopes before it spreads.
Rotate your seed stock the same way you’d rotate a pantry: oldest seed gets planted or tested first, newest seed goes to the back of the jar. A running list taped inside the lid, sorted by year, keeps this simple.
Fridge vs. Freezer: Matching the Method to Your Timeline
The refrigerator and freezer solve two different problems, and mixing them up is where most home seed-saving goes wrong. A refrigerator at 32 to 41°F is the right call when you’re storing seed you plan to use within the next one to three growing seasons, like extra tomato or squash seed you saved this fall for next spring. It’s forgiving of seed that’s dry but not perfectly dry, and you don’t need a multi-day pre-drying protocol to get good results.
A freezer at 0°F or below is for seed you want to keep viable for five, ten, or more years, the kind of long-term backup stash serious seed savers build up over time. That extra shelf life comes with a strict requirement: the seed has to pass the bend test before it goes anywhere near the freezer. Skip that step and you risk killing the very seed you’re trying to preserve.
One detail worth knowing: a self-defrosting refrigerator or freezer cycles warm air through periodically to prevent ice buildup, which also slowly pulls moisture out of anything stored inside, including your seed jars. A manual-defrost chest freezer doesn’t do this, so seed inside stays at whatever moisture level it went in with. Neither is wrong, but it changes how much pre-drying you need to do.
Whichever unit you use, the container matters as much as the temperature. An unsealed jar or a plastic bag with a loose fold still lets humidity creep in over months of storage, slowly raising the moisture content of everything inside even at freezing temperatures.
Where in the House Should You Actually Store Seeds?
The 100 Rule is only useful if you know which rooms in your house tend to score well, and most people are surprised by the answer. A hall closet on an interior wall almost always beats a garage shelf, even though the garage feels “colder” in winter, because temperature stability matters more than raw cold. Seeds degrade fastest when they’re repeatedly warmed and cooled, not simply when they sit at a moderate temperature.
That’s why a detached garage or an uninsulated shed, despite feeling like obvious “cold storage,” often performs worse than a bedroom closet. Garage temperatures can swing 40 or 50 degrees between a summer afternoon and a winter night, and each swing pushes moisture in and out of the seed coat. A closet, a linen cabinet, or a spot under a bed in a climate-controlled home stays within a narrow band year round.
Basements are usually excellent if they’re dry, since they run cool and stable, but a damp basement will quietly ruin seed through humidity alone even at a good temperature.
Extension guidance generally flags anything above 70°F or 60% relative humidity as a warning zone, regardless of which room you’re in. A dedicated, insulated space like a well-sealed greenhouse storage bench or a small greenhouse structure built with vents and shade cloth can actually outperform parts of a house, since you control airflow and light directly rather than inheriting whatever the room does.
How Long Do Stored Seeds Actually Stay Viable?
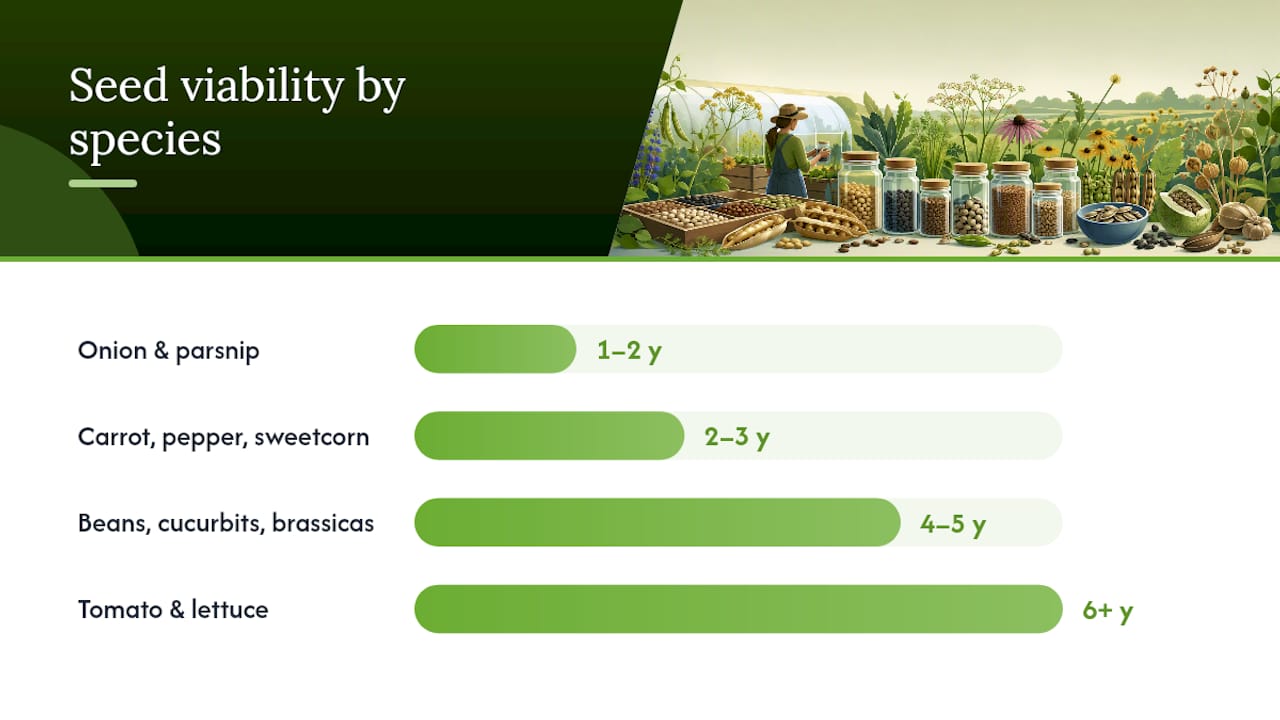
Viability windows vary a lot by species, and knowing the rough numbers helps you decide what to save versus what to buy fresh each year. Onion and parsnip seed drops off fastest, often unreliable past one or two years even with good storage. Carrots, peppers, and sweet corn typically hold for two to three years. Beans, peas, cucumbers, squash, and most brassicas commonly last four to five years when kept dry and cool. Tomato and lettuce seed are the champions, frequently still germinating well at the six-year mark and sometimes longer.
Beans and peas deserve a specific caution here: they tolerate less aggressive drying than small, oil-rich seeds like lettuce or carrot. Pushing them too dry can trigger a “hard seed” condition where the seed coat becomes so impermeable that water can’t get in to trigger germination at all, even though the seed itself is perfectly alive. If you save legume seed, dry it to the point it passes the bend test and stop there rather than chasing an extra week of drying for insurance.
These numbers assume storage that respects the 100 Rule throughout. A jar of tomato seed sitting on a sunny windowsill won’t come close to six years. The species sets your ceiling; your storage conditions decide whether you get anywhere near it.
Gridwise Perspective: A Seasonal Workflow Worth Repeating
The gardeners who never lose a seed lot treat storage as one continuous loop, not a fall chore: collect seed as crops finish, dry it to the bend test, run a quick germination check on anything older than two years, package it airtight with a desiccant, store it somewhere that passes the 100 Rule, label it clearly, and plant from the oldest jar first come spring. Miss one link, usually the drying step, and the whole chain breaks. If you’re setting up seed starts from that stored inventory, our guide on starting seeds indoors picks up exactly where this one leaves off, and if you’re also managing a bigger harvest, preserving bulk homegrown food covers the produce side of the same seasonal rhythm.
— Gridwise
Make Next Season Easier With the Right Storage Setup
You don’t need a lab to store seed well, but you do need consistency, and that’s exactly where a lot of home setups fall short. A drafty garage or a humid shed undercuts even perfect drying technique, while a dedicated, sealed space holds its conditions without you having to think about it. Gridwiseliving carries greenhouse structures built with vents and swing doors that give you a stable, shaded space for both storing dried seed and starting the next round of seedlings, along with growing accessories like trays and containers that round out a seed-saving setup.

If you’re planning next season’s garden now, a good starting point is our 10x32ft aluminum polycarbonate greenhouse, sized for both growing space and a dry storage bench along one wall. Check current availability and get a price breakdown before your next planting cycle starts.
Sources
- Considerations for stored seed — Ohio State Ag Crops Newsletter
- How long do seeds last? — Cornell Small Farms
- Collecting and storing seeds from your garden — Utah State Extension