

How to Preserve Bulk Homegrown Harvests for the Long Term
To preserve homegrown bulk harvests long term, you need three systems working together: dry, airtight cold storage for seeds; a zoned, cool, humid root cellar for potatoes, carrots, and beets; and greenhouse-based curing paired with power-protected cold storage for everything else. Each system has its own target numbers, and hitting them is what separates a harvest that lasts eight months from one that rots in eight weeks.
Do this today: pull a handful of saved seed and finish drying it, or move one crate of root vegetables into the coolest spot you can reach and set a hygrometer and thermometer next to it. You’ll want that data before you build anything permanent.
- Seeds: dry to under 8% moisture, then store at roughly 0°F for multi-year viability.
- Root cellar: hold 32–40°F with 85–95% relative humidity.
- Greenhouse + cold storage: cure produce on-site, then move it to power-backed refrigeration before frost risk sets in.
Gridwiseliving builds its greenhouse lineup and solar systems around exactly these numbers, because a structure that can’t hold a temperature range is just an expensive way to grow weeds.
Key Takeaways
Long-term preservation of homegrown bulk harvests depends on hitting three separate but connected targets: dry, stable-temperature seed storage, humidity-controlled root cellaring, and power-protected cold storage for perishables.
| Point | Details |
|---|---|
| Seed moisture and temperature | Dry seeds below 8% moisture and store near 0°F for multi-year viability. |
| Root cellar zoning | Hold 32–40°F and 85–95% humidity for roots; keep onions and squash in a drier, warmer zone. |
| Greenhouse curing | Cure onions, garlic, and squash for 10 days to two weeks before moving them to cold storage. |
| Backup power sizing | Match a chest freezer’s watt-hours per day to solar, battery, or generator capacity before an outage hits. |
| Rotation and testing | Track harvest date and location in a simple spreadsheet, and retest older seed lots every one to three years. |
| Build with Gridwiseliving | Gridwiseliving’s greenhouses and solar systems are built to the venting and power specs this guide recommends. |
Table of Contents
- How Do You Store Seeds for Long-Term Bulk Preservation?
- What Temperature and Humidity Does a Root Cellar Need?
- Can a Greenhouse Extend Your Bulk Harvest Window?
- What’s the Best Backup Power for Long-Term Cold Storage?
- How Should You Organize and Rotate Bulk Stores?
- Curing Techniques That Stretch Shelf Life for Months
- Storing Dried and Dehydrated Foods at Scale
- Fermenting Bulk Harvests for Long-Term Preservation
- Building a Low-Energy Root Cellar or Storage Room
- Low-Energy Cold Storage Options Beyond a Root Cellar
- Why Homeowners Overcomplicate Long-Term Food Storage
- Where to Start Building Your Storage System
- Sources
How Do You Store Seeds for Long-Term Bulk Preservation?
Seeds fail for two reasons, and they’re not the ones most gardeners guess. It’s not sunlight or age alone. It’s moisture and temperature fluctuation, and the two compound each other. A seed at 6% moisture sitting in a stable 40°F room will often outlast a bone-dry seed that swings between a hot garage and a cold porch every day.
Start with drying. Spread seeds in a single layer somewhere shaded and airy, out of direct sun, for one to two weeks depending on the variety. A frost-free refrigerator works too, since it constantly pulls humidity out of the air. Skip the oven and the microwave entirely; anything over 100°F cooks the embryo before you notice a problem.
- Confirm moisture with a humidity indicator card or the simple snap test. Bean seeds should shatter, not bend, when dry enough.
- Choose your tier. Short-term storage (under a year) tolerates around 12% moisture at 32–41°F. Long-term storage needs 3–8% moisture and a freezer running near 0°F, a combination Colorado State Extension links to viability stretching past 10 years for many species.
- Package immediately. Glass jars with rubber gaskets, a silica desiccant sachet, and a paper label listing crop, variety, and harvest date. Skip plastic bags; they breathe more than people assume.
- Test annually. Roll ten seeds in a damp paper towel, fold it into a bag, and check germination after a week. Below 70%, plant that lot sooner rather than later.
Freeze treatment (48 hours at 0°F) kills weevils and moth larvae hiding in bulk seed lots before they spread to a whole shelf.
Pro Tip: Never open a jar straight from the freezer. Let it sit at room temperature for a couple of hours first, or condensation will form on the seeds the moment cold glass meets warm kitchen air, undoing months of careful drying.
What Temperature and Humidity Does a Root Cellar Need?
Most root crops hold their texture and flavor best between 32°F and 40°F with humidity at 85% to 95%, and getting that humidity number right is usually harder than the temperature. A cellar that’s too dry turns carrots rubbery in weeks. A handful of crops break that rule entirely.
Store them in the same room as your potatoes and you’ll shorten the life of both, since one crop’s humidity source encourages rot in the other. The fix is microzoning, not two separate buildings.
- Put root-level bins for potatoes, carrots, and beets on the floor, where cold air naturally settles.
- Build or install upper shelving near the ceiling, a few degrees warmer, for squash and onions.
- Add a partition or simple curtain if one corner runs noticeably drier or warmer than the rest.
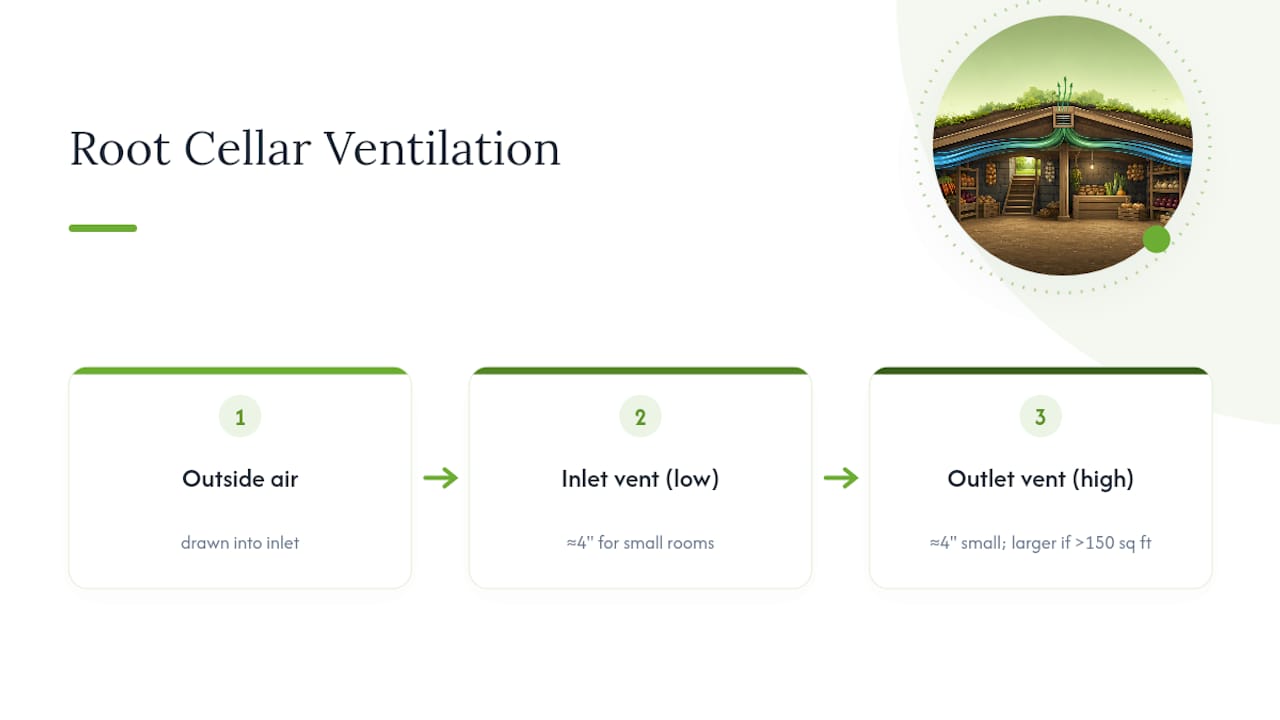
Ventilation does the heavy lifting for humidity control. A low intake vent paired with a high exhaust vent creates passive stack-effect airflow with no fan required, though you’ll want to close both down tighter in deep winter and open them wider in early fall. A shallow pan of water on the floor raises humidity fast if the room runs dry; a bit of gravel or a small sump handles the opposite problem when spring runoff threatens to flood a below-grade cellar.
Check a hygrometer and thermometer at least weekly, since humidity drifts faster than temperature does and it’s the number most homeowners forget to track until something turns soft.
Can a Greenhouse Extend Your Bulk Harvest Window?
A greenhouse doesn’t just grow food earlier. Used right, it becomes a staging and curing space that shrinks how much produce you’re stuffing into cold storage all at once.
Passive controls do most of the work. Vent area equal to 15% to 20% of your floor space keeps summer heat from cooking tender crops, and roughly one gallon of water mass per square foot of south-facing glazing buffers night temperature swings without electricity. Shade cloth at 30% to 50% density knocks down peak afternoon heat during the hottest curing weeks.
- Stagger plantings through the season so harvest arrives in manageable waves instead of one overwhelming glut.
- Cure thick-skinned crops on-site. Onions and garlic need one to two weeks in warm, dry, ventilated air before their necks fully seal. Winter squash cures in 10 days to two weeks at 80–85°F to convert starches to sugar and toughen the rind.
- Install thermal curtains or automatic vent openers if you’re away during the day; a greenhouse can swing 40 degrees in an afternoon without warning.
- Move cured produce out promptly. Once squash and onions finish curing, shift them to root-cellar shelving. Leaving them in greenhouse heat past curing undoes the work.
A structure with real venting and glazing built for this cycle, like Gridwiseliving’s heavy-duty aluminum polycarbonate greenhouses, makes staggered planting and curing far less fussy than a flimsy kit that bakes everything by noon. For a fuller planting rhythm, see this year-round greenhouse plan.
What’s the Best Backup Power for Long-Term Cold Storage?
A chest freezer beats a standard upright for bulk storage because cold air sinks and stays put every time you open the lid, instead of spilling out the door. That single design difference often means the contents survive a four to six hour power outage with barely a temperature blip.
- Keep sealed containers closed until they return to room temperature; opening cold-stored food or seed too soon invites condensation that ruins texture and viability alike.
- Estimate your freezer’s watt-hours per day, then size backup capacity to match, whether that’s a portable solar kit, a larger solar and battery setup, or a portable generator for shorter gaps.
- During an outage, group the most temperature-sensitive items together near the bottom and skip unnecessary lid openings; every open costs you stored cold you can’t easily replace.
Pro Tip: Track roughly how long each food category stays safe without power. Meat and dairy give you the least runway; hard vegetables and cured squash give you the most, so open the freezer for those last.
How Should You Organize and Rotate Bulk Stores?
A simple spreadsheet beats memory every time. Track crop, variety, harvest date, storage method, and shelf location in five columns, and update it the day you put something away, not weeks later.
- Rotate by age, always pulling the oldest stock first, and test seed germination every one to three years depending on the species.
- Store in pest-proof containers like sealed glass or heavy plastic bins, kept off the floor and away from wall gaps where rodents travel.
- Run a seasonal audit each fall and spring, checking for soft spots, mold, or sprouting before it spreads to neighboring bins.
Color-coded lids by crop type turn a five-minute search into a five-second glance.
Curing Techniques That Stretch Shelf Life for Months
Curing is the step most home growers skip, and it’s the reason store-bought onions outlast homegrown ones sitting in the same pantry. The process thickens skins and seals off the neck or stem end, blocking the moisture loss and rot that ruin uncured produce within weeks.
Onions and garlic need one to two weeks in warm, dry air around 80–90°F with good airflow, tops still attached, spread in a single layer rather than piled. Once the outer skins turn papery and the necks feel tight, trim the tops to an inch and move bulbs to mesh bags in a cool, dry spot, not the humid root cellar shelves meant for carrots.
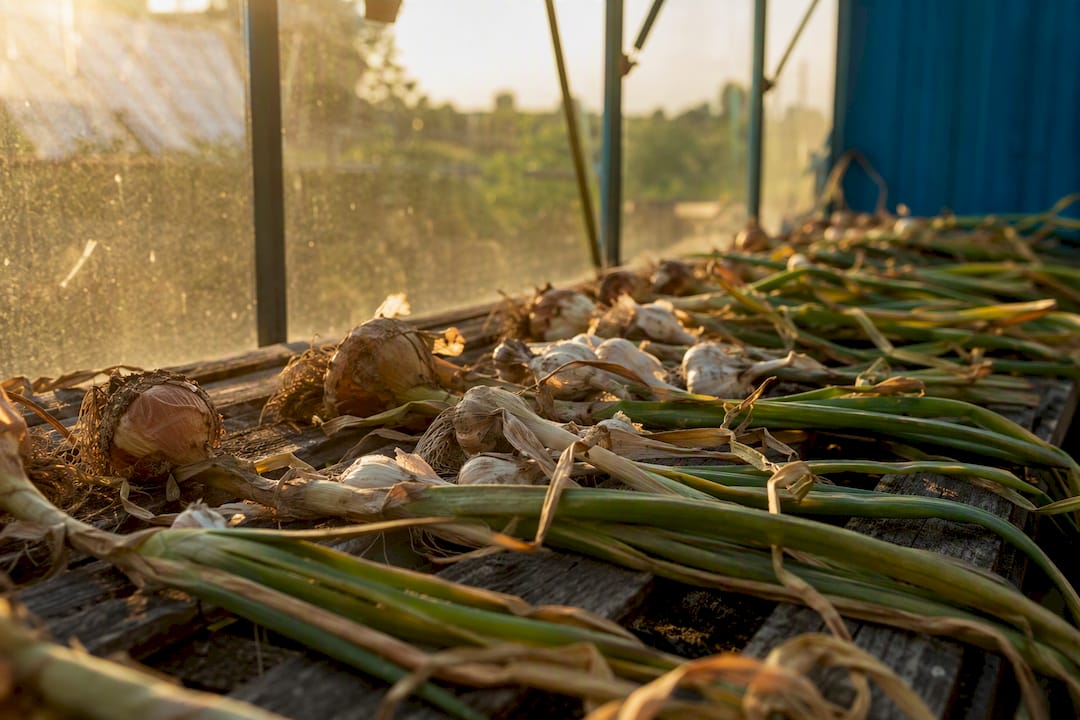
Winter squash and pumpkins cure at a slightly cooler 80–85°F for 10 days to two weeks. This step converts starches into sugar, which is why a cured butternut squash tastes noticeably sweeter than one eaten fresh off the vine. Skip curing and you’ll see soft spots forming within a month.
Sweet potatoes need higher humidity during curing, around 85% to 90%, at 80–85°F for four to seven days, then storage at a warmer 55–60°F rather than the cold root-cellar range that suits white potatoes.
A greenhouse with adjustable venting doubles as curing space during the exact weeks you need it, since it holds warm, dry air far more consistently than an open porch or garage. Skipping this step is the single most common reason bulk harvests spoil before winter even sets in.
Storing Dried and Dehydrated Foods at Scale
Dehydrated food fails almost exclusively through rehydration from ambient humidity, not from age. A properly dried tomato or apple slice can last a year or more; the same slice left slightly underdried, or repackaged carelessly, molds within weeks.
Confirm dryness before packaging anything in bulk. Fruit should feel leathery with no sticky or moist spots. Vegetables should snap cleanly. Herbs should crumble to dust between your fingers. If a batch feels even slightly pliable in the middle, dehydrate it further before it goes into storage.
Mylar bags with oxygen absorbers handle bulk dried goods better than glass jars for anything you’re storing in large quantities, since they block light and compress easily onto a shelf. For smaller jars you’ll open regularly, add a food-safe desiccant packet and check it monthly. If a desiccant packet feels damp or has changed color, the container has a seal problem worth fixing before the whole batch turns.
Store dried foods at a stable, cool temperature, ideally under 70°F, away from direct light. Heat is the quiet enemy here. Every 10 degree rise in storage temperature roughly doubles the rate of nutrient loss and flavor degradation in dried food, which is one more reason a root cellar’s cool zone often works better for dried goods storage than a warm kitchen pantry shelf.
Fermenting Bulk Harvests for Long-Term Preservation
Fermentation turns a glut of cabbage or cucumbers into a shelf-stable food that actually improves over the first few weeks, driven by lactic acid bacteria that occur naturally on the produce itself. No canning equipment required, and no added preservatives.
For sauerkraut, shred cabbage, salt it at roughly 2% of the cabbage’s weight, and pack it tightly enough that the released liquid covers the shreds completely. Keep it submerged with a weight, cover loosely to let gas escape, and let it sit at room temperature for two to four weeks depending on how tangy you want it. Once fermentation slows, move jars to cold storage between 32°F and 40°F, the same range your root cellar already holds, where fermented vegetables can keep for many months.
The biggest bulk-batch mistake is inconsistent salt ratios across jars. Too little salt invites the wrong bacteria and produces a mushy, off-smelling batch. Weigh your salt rather than eyeballing it, especially when you’re processing a full bushel at once instead of a single jar. A kitchen scale costs less than the cabbage you’d otherwise waste.
Building a Low-Energy Root Cellar or Storage Room
You don’t need a dug-out hillside cellar to hit root-storage numbers. An insulated corner of a basement, an unheated mudroom, or a buried shipping container can all work if you control three things: insulation, ventilation, and moisture source.
Insulate walls and ceiling to at least R-15 if you’re building new, using rigid foam board where moisture resistance matters more than a high R-value alone. Concrete block or poured concrete walls hold cold naturally and resist rot better than wood framing in a humid environment. If you’re converting an existing basement corner, a simple stud wall with vapor-resistant insulation and a solid door seals the zone off from the warmer, drier rest of the house.
Ventilation follows the same low-intake, high-exhaust logic as a dedicated cellar: one vent pipe near the floor pulling outside air in, one near the ceiling letting warm air escape. Size both around 4 inches in diameter for a small room, larger for anything over 150 square feet.
For humidity, exposed dirt or gravel flooring naturally releases moisture into the air, which is part of why traditional dirt-floor cellars hit their humidity targets with so little effort. If your floor is sealed concrete, a shallow gravel bed with water misted onto it periodically replicates that effect. Site selection matters too. Choose the north side of a structure to avoid solar heat gain, and grade the surrounding soil away from the entrance to keep spring runoff out entirely.
Low-Energy Cold Storage Options Beyond a Root Cellar
A chest freezer running on grid power isn’t your only option for keeping perishables cold, and for some climates it isn’t even the most efficient one.
Evaporative coolers work well in dry climates, using the same principle as a swamp cooler: water evaporating off a wet surface pulls heat out of the surrounding air. They’re far less effective in humid regions, where the air is already too saturated to absorb much more moisture, so match this option to your local climate before investing in one.
Buried storage containers, whether a repurposed culvert pipe, a partially sunken chest, or a small underground vault, take advantage of stable earth temperature a few feet down, which hovers close to your area’s annual average regardless of surface weather. This is essentially a miniature root cellar without the full room build, and it suits a family with a modest harvest who doesn’t need walk-in storage.
Zeer pots, a clay-pot-in-clay-pot design with wet sand between the layers, offer the lowest-energy option of all for small quantities of produce, dropping internal temperature through evaporative cooling with zero power input. They won’t replace a chest freezer for bulk meat storage, but for a few days’ worth of vegetables between harvest and cellar transfer, they’re a genuinely useful stopgap.
Whichever option you choose, the same rule applies across all of them: monitor with a thermometer rather than assuming the design works as advertised, since site conditions change the real-world performance more than any spec sheet suggests.
Why Homeowners Overcomplicate Long-Term Food Storage
Most guides treat seed storage, root cellars, and greenhouses as three unrelated projects, and that’s backward. They’re one system. A greenhouse that cures your onions properly means fewer onions rot before they reach the cellar. A root cellar that hits its humidity target means fewer squash need refrigeration at all. Get the sequencing right and you spend less on backup power, not more.
The other overlooked point: homeowners obsess over cold, but moisture control fails first almost every time. A cellar two degrees too warm rarely ruins a harvest. A cellar 15 points off its humidity target will, and it’ll do it in days, not weeks.
Durable, well-vented structures matter more than clever gadgets here. A greenhouse that actually hits its vent-area ratio and a chest freezer sized correctly to your backup power will outperform any amount of app-based monitoring layered onto a poorly built space.
— Gridwise
Where to Start Building Your Storage System
If you’ve read this far, you’ve probably already spotted the gap in your own setup, whether that’s a greenhouse with no real venting, a pantry corner masquerading as a root cellar, or a freezer with zero backup power behind it — consider how you might open a farm stand to direct market your surplus efficiently. Gridwiseliving sells the structural pieces that make the numbers in this guide achievable at home, not just theoretically possible.

Start with the greenhouse collection if curing and season extension are your bottleneck, since a properly vented structure does the work this guide describes without daily babysitting. If backup power for a chest freezer is the missing piece, the solar energy systems lineup covers everything from a portable kit for short outages to larger setups sized for a full harvest season. Families outgrowing a single storage room sometimes find it simpler to add dedicated space entirely, and the tiny home options can be configured with that kind of storage zone built in from the start. Browse the product specs, match wattage and square footage to what you calculated in the sections above, and order the piece that closes your specific gap first.
Sources
- Storing vegetable and flower seeds (Colorado State Extension)
- Seed storage and handling (Extension, Utah State University)