

Off Grid Tiny House Power: Size Solar for Tight Roofs and 48V Batteries
For most tiny houses, plan on a 0.5 to 2 kW solar array paired with a 5 to 15 kWh 48V LiFePO4 battery bank, sized to your actual appliance load. Costs vary significantly depending on electricity usage and equipment choices. Roof space is the real ceiling on what you can generate, which is why the choice between an all-electric kitchen and a propane range matters more than most buyers assume before they start shopping.
TL;DR:
- Roof space typically limits solar arrays to about four to eight 400W panels, which caps energy generation unless ground-mounted or portable panels are used.
- A 48V LiFePO4 battery bank ranging from 5 to 20 kWh is optimal for various off-grid tiny house setups, with proper placement and temperature control extending lifespan.
- Induction cooking and mini-split systems can significantly increase daily energy needs, with a single hour of induction cooking consuming around 2 kWh.
- Power system costs vary from $2,000 for basic DIY setups to over $25,000 for fully electric, professionally installed systems supporting larger loads.
- Proper component sizing, including matching inverter and battery voltage and ensuring safety and permits, is essential to prevent damage and ensure reliable operation.
Table of Contents
- How Do You Choose Off Grid Tiny House Power Components?
- How Much Solar Power Do You Need for a Tiny House?
- What If Your Roof Can’t Fit Enough Panels?
- Why Do 48V LiFePO4 Batteries Work Best for Tiny Homes?
- How Much Power Do Induction Cooking and Mini-Splits Really Use?
- What Permits and Safety Steps Does an Off Grid System Need?
- What Does an Off Grid Tiny House Power System Cost?
- Where Can You Start With a Gridwiseliving System?
- How Long Do Panels, Batteries, and Inverters Actually Last?
- Why Does Inverter and Battery Matching Matter So Much?
- How Should You Route Wiring in a Tiny House?
- DIY vs. Professional Installation: What’s the Real Cost Difference?
- When Should You Go Full Off-Grid vs. Hybrid?
- Ready to Build Your Off Grid Power System?
- Sources
- FAQ
How Do You Choose Off Grid Tiny House Power Components?
Every off grid tiny house power system needs five core pieces: panels, an inverter/charger, a charge controller, a battery bank, and the balance-of-system hardware that ties them together safely. Get the sizing logic right here and the rest of the build follows.
Higher-wattage panels (400W monocrystalline units instead of older 250W to 300W panels) matter most when roof space is tight, since you’re maximizing output per square foot rather than per dollar. Your inverter/charger needs enough continuous wattage to cover your simultaneous loads and enough surge capacity for motor startup (a fridge compressor or well pump can spike three to five times its running wattage for a second or two). Match its voltage to your battery bank exactly. For arrays under roughly 2 kW, an MPPT controller earns its higher price over PWM by pulling 20% to 30% more usable power from the same panels, especially on cool, bright days.
LiFePO4 is the practical choice for battery chemistry, discussed more below. Beyond the big four components, don’t skimp on:
- DC and AC disconnects near the battery and inverter for safety and code compliance
- A properly rated battery combiner or busbar
- A generator inlet or transfer switch for backup power
- Correctly gauged wire and overcurrent protection sized to your amperage
How Much Solar Power Do You Need for a Tiny House?
Start with your appliance list, not your budget. Add up the wattage of everything you’ll run and multiply by average daily hours of use to get watt-hours, then divide by 1,000 for daily kWh.
- Inventory and estimate. List every appliance (fridge, lights, laptop, water pump, fans) with its wattage and daily run hours, then sum to daily kWh.
- Build in a reserve. Add 20% to 30% for system losses (inverter inefficiency, wiring, battery charge/discharge losses) and to protect your depth of discharge.
- Convert to solar kW. Divide your padded daily kWh by your location’s average peak sun hours (commonly 3 to 6, depending on climate and season, per state-level solar data from the EIA), then divide by a system efficiency factor around 0.75 to 0.8.
- Size the battery for autonomy. Multiply daily kWh by the number of cloudy or backup days you want covered, then divide by your usable depth of discharge (LiFePO4 typically allows 80% to 100%).
Three real-world load profiles:
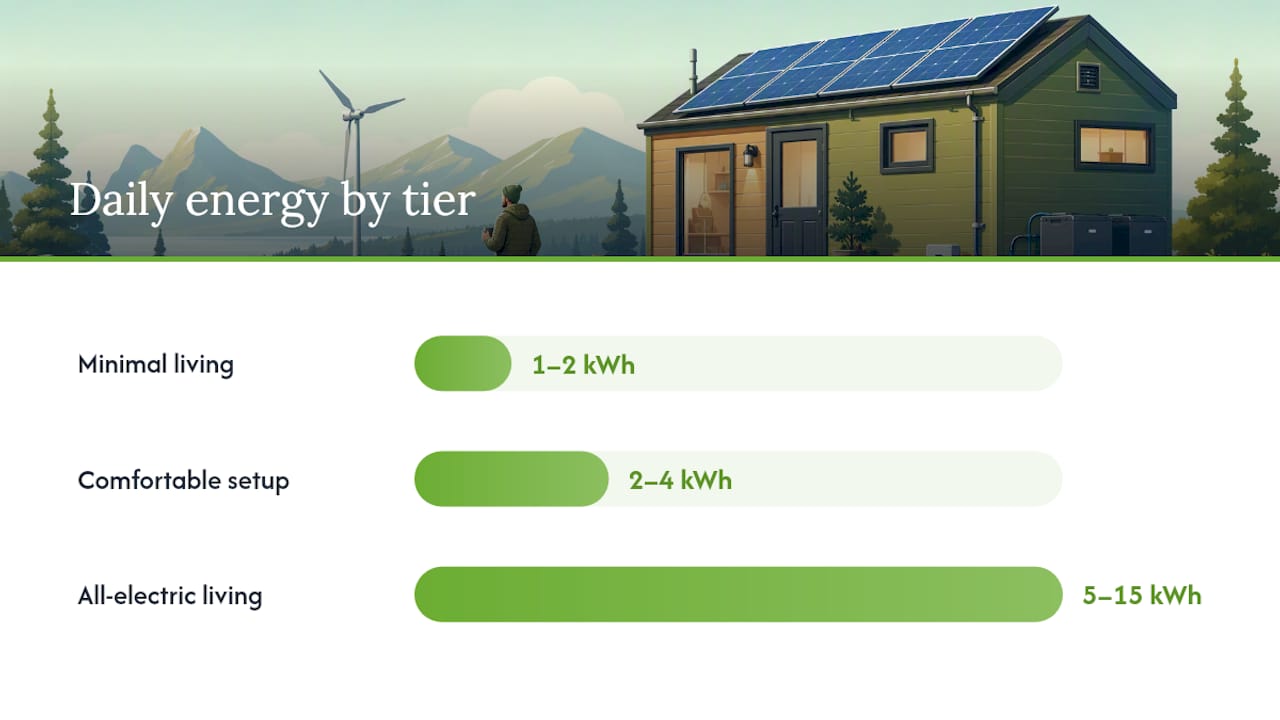
Minimal off-grid living (propane cooking and heat, basic lighting and electronics) usually runs 1 to 2 kWh per day, according to sizing calculator benchmarks, and needs roughly 0.4 to 0.8 kW of solar with a 3 to 5 kWh battery. A comfortable setup with a standard fridge, laptop charging, and modest lighting lands around 2 to 4 kWh daily, calling for 0.8 to 1.3 kW of solar and 6 to 10 kWh of battery. All-electric living with induction cooking and a mini-split climbs to 5 to 15 kWh per day, which pushes you toward 2 to 5 kW of solar and 12 to 20 kWh of battery capacity.
What If Your Roof Can’t Fit Enough Panels?
Most tiny houses have somewhere between 150 and 300 square feet of usable roof, which caps you at roughly four to eight 400W panels before you run out of room, according to SolarReviews’ analysis of tiny-house roof constraints. When that ceiling isn’t enough, a few strategies close the gap:
- Ground-mounted or tilt-frame arrays sit beside the house and can angle toward the sun for better seasonal yield than a flat roof allows.
- Seasonal deployable panels get set up in summer camps or long-term parking spots, then packed away when you move.
- Portable briefcase kits, like Gridwiseliving’s 100-Watt Portable Briefcase Offgrid Solar Panel Kit with Proteusx 20-Amp Charge Controller, work well for supplemental charging or as a mobile backup when the fixed array falls short.
Owners with limited roof space often pair a compact rooftop array with a ground-deployable supplemental panel they bring out for winter or while parked long-term.
Pro Tip: Tilt your ground-mounted or portable panels to roughly your latitude plus 15 degrees in winter. That single adjustment can meaningfully boost cold-weather output when the sun sits low on the horizon.
Why Do 48V LiFePO4 Batteries Work Best for Tiny Homes?
A 48V architecture cuts the current running through your wires compared to 12V or 24V systems at the same power draw, which means thinner, lighter cable and less energy lost as heat. VoltTech’s engineering guide recommends 48V specifically for tiny homes because it also simplifies inverter selection for standard 120V AC loads.
LiFePO4 batteries outlast and outperform older lead-acid or AGM options in nearly every category that matters in a small footprint:
- Rated for thousands of charge cycles rather than a few hundred, so they typically last a decade or more
- Chemically stable and far less prone to thermal runaway
- Roughly half the size and weight of lead-acid for the same usable capacity, which matters when every cubic foot counts
For sizing, a 5 to 8 kWh bank suits minimal living, 8 to 12 kWh handles comfortable day-to-day use, and 12 to 20 kWh supports all-electric households or households wanting several days of cloudy-weather backup. Mount the bank in a ventilated, temperature-stable spot (a closet or under-bed compartment works), and check the manufacturer’s weight rating before building it into cabinetry.
How Much Power Do Induction Cooking and Mini-Splits Really Use?
Big appliances change everything about your sizing math. An induction burner typically pulls 1,800 to 3,000 watts, a mini-split AC unit runs 500 to 1,500 watts continuously, and resistive space heaters can draw 1,500 watts or more for hours at a stretch.
A single one-hour cooking session on a 2,000-watt induction burner can consume roughly 2 kWh, close to an entire day’s power budget for a minimal off-grid setup. Running a mini-split for eight hours at 1,000 watts adds another 8 kWh, which is why VoltTech’s guide flags induction cooking as one of the biggest single swings in daily energy demand.
The practical fix: lean on propane or wood heat for space heating off-grid, and treat a mini-split as an occasional comfort tool rather than an always-on system. Size your inverter’s surge rating generously for these loads. They’re intermittent but demanding, and an undersized inverter will trip or shut down mid-cook.
What Permits and Safety Steps Does an Off Grid System Need?
Most standalone off-grid systems don’t require utility interconnection paperwork, but that doesn’t mean permits disappear. Local building departments frequently require an electrical permit and inspection for any fixed battery bank, inverter installation, or generator transfer switch, and grid-tied or grid-interactive setups almost always need a licensed electrician and utility sign-off.
Expect an inspector to check for:
- Properly rated and labeled DC and AC disconnects
- Correct overcurrent protection and wire gauge for your amperage
- Battery ventilation and secure, accessible mounting
- A code-compliant generator inlet if you’re planning backup power
Before you start, confirm your local permit requirements, get quotes from a licensed installer for anything touching your main panel, and map out where disconnects and the generator inlet will live.
What Does an Off Grid Tiny House Power System Cost?
Budgets scale directly with how much all-electric living you want to support. A DIY starter kit built around a portable power station and one or two panels runs roughly $2,000 to $6,000. A mid-range installed system with a real rooftop array, MPPT controller, and an 8 to 12 kWh LiFePO4 bank typically lands between $10,000 and $20,000, a range consistent with King Resources’ overview of tiny-home solar capacity and cost. A full all-electric build with a larger array, 15 kWh or more of battery, and professional installation can reach $25,000 to $35,000 or higher.
If you’re staging the investment, put your first dollars into the battery bank and inverter rather than maxing out panels. Those two components determine whether you can actually use the power you generate. A portable power station is a reasonable low-cost entry point that lets you add fixed panels and a larger battery bank later without starting over.
Where Can You Start With a Gridwiseliving System?
Gridwiseliving’s ‘Solar for Tiny Houses’ sizing guide walks through the same load calculation approach in more depth, with worksheets for your specific appliance list. The companion piece, ‘The Role of Solar in Tiny Homes’, helps you weigh full off-grid against hybrid or grid-tied approaches before you commit.
Two starter paths cover most situations. For light or mobile use, the 100-Watt Portable Briefcase kit with its Proteusx 20-amp charge controller gets you charging within an afternoon, no permits required. For a household ready for whole-home coverage, the Powerhouse Gen 2 Whole Home Solar Generator pairs a larger battery bank with inverter capacity built for daily, all-electric use.
How Long Do Panels, Batteries, and Inverters Actually Last?
Solar panels are the most durable part of the system by a wide margin. Most monocrystalline panels carry 25-year performance warranties and still produce 80% or more of their original output at the end of that span. Physical damage from hail or falling branches is a bigger real-world risk than gradual degradation.
Batteries are where lifespan varies the most by chemistry. LiFePO4 packs typically deliver 2,000 to 6,000 charge cycles, which works out to 10 to 15 years of daily cycling for most tiny-house use patterns. Older lead-acid or AGM batteries last a fraction of that, often just 3 to 5 years, since they degrade faster with deep discharges. Keeping your LiFePO4 bank between 20% and 90% state of charge on a daily basis, rather than routinely draining it to zero, extends its usable life meaningfully.
Inverters and charge controllers are the components most likely to fail first, typically lasting 10 to 15 years. Heat is their main enemy, so mounting them in a ventilated, temperature-controlled space (not a hot attic or an uninsulated exterior box) adds years to their service life.
Plan on light annual maintenance across the board: check panel connections and clean off debris or snow buildup, inspect battery terminals for corrosion, and verify that your inverter’s cooling fan is unobstructed. None of this requires a technician, but skipping it shortens the life of every component in the system.
Why Does Inverter and Battery Matching Matter So Much?
A mismatched inverter and battery bank is one of the most common and costly mistakes in DIY off-grid builds. Your inverter’s input voltage must match your battery bank exactly: a 48V inverter needs a 48V battery bank, full stop. Mixing voltages, or connecting a battery bank with a different voltage than the inverter expects, doesn’t just underperform. It can damage both components.
Beyond voltage, check that your inverter’s continuous and surge wattage ratings align with what your battery can actually deliver. A battery’s maximum continuous discharge current is usually listed in its specifications, and a good rule of thumb is keeping your inverter’s max draw comfortably under that ceiling; pulling too much too fast shortens battery life and can trip built-in protection circuits.
Charge controllers need similar attention. An MPPT controller’s rated input voltage and amperage must accommodate your panel array’s open-circuit voltage, especially in cold weather when panel voltage rises. Undersizing a controller for a larger array down the road is a common regret, so it’s worth sizing the controller for where your system might grow, not just where it starts.
Communication matters too. Many modern LiFePO4 batteries include a battery management system (BMS) that can talk to a compatible inverter over standard protocols, allowing the inverter to adjust charging based on real battery data rather than generic assumptions. Not every inverter and battery pair support this, so confirming compatibility before purchase saves a return shipment and a wasted weekend.
How Should You Route Wiring in a Tiny House?
Tiny houses give you almost no room for wiring mistakes, which makes planning your conduit routes before you close up walls essential. Run DC wiring from the roof to the battery bank via the shortest practical path, since every extra foot adds resistance and voltage drop, particularly at 12V or 24V. This is another reason 48V architecture pays off: shorter effective voltage drop over the same wire run.
Keep DC and AC wiring in separate conduits or clearly separated runs wherever possible, both for safety and to simplify future troubleshooting. Label every wire at both ends, since tiny-house electrical panels are often accessed just once a year and a mislabeled wire during a repair wastes real time.
Locate your battery bank close to the inverter to minimize DC cable length and voltage drop, but ensure the space is ventilated, since even sealed LiFePO4 batteries release some heat during heavy charge and discharge cycles. A closet with a louvered door or a dedicated under-floor compartment with a vent works better than a fully sealed cabinet.
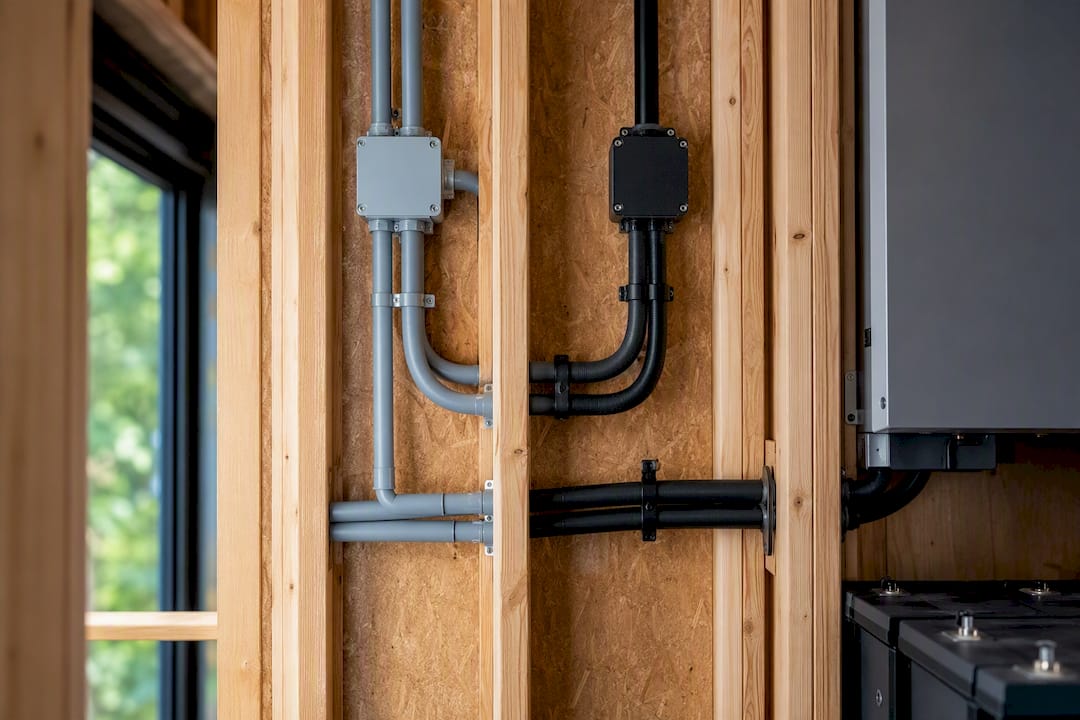
Route conduit through structural cavities where you can, rather than surface-mounting exposed wire, both for aesthetics and to protect against physical damage in a home that flexes slightly during transport if it’s on wheels. Leave service loops (a few extra inches of slack) at every connection point so you can make repairs without re-running an entire cable. Finally, plan your generator inlet and any transfer switch location early. Retrofitting one after interior walls are finished is far more disruptive than wiring it in during the initial build.
DIY vs. Professional Installation: What’s the Real Cost Difference?
Labor is where the DIY versus professional cost gap really opens up. A licensed installer typically charges $1,500 to $4,000 in labor for a full off-grid tiny-house system, on top of equipment costs, depending on system complexity and local rates.
Doing the installation yourself can eliminate most of that labor cost, but it comes with real trade-offs. You’ll need comfort with basic electrical work, a willingness to research your local permit requirements, and the patience to correctly torque connections and size wire gauge, since mistakes here create fire risk, not just inconvenience. Many DIY-inclined owners split the difference: they handle panel mounting and basic wiring themselves, then hire a licensed electrician just for the final battery bank tie-in and inspection, which often runs $500 to $1,200 and satisfies most local permit requirements.
A single fried charge controller or an inspection failure requiring rework can erase most of that savings fast. For anything involving a transfer switch, generator inlet, or grid-interactive component, hiring a licensed electrician isn’t just safer. It’s usually required by your local jurisdiction regardless of how much of the rest of the system you build yourself.
When Should You Go Full Off-Grid vs. Hybrid?
Full off-grid makes sense if you’re parking somewhere remote, prioritizing quiet, self-contained operation, and willing to manage propane or wood heat instead of an always-on mini-split. If you’re staying near a grid connection or splitting time between locations, a hybrid setup with battery backup and occasional shore power often delivers more comfort for less upfront cost. Either way, the sizing math and the 48V LiFePO4 recommendation from the top of this guide hold.
— Gridwise
Ready to Build Your Off Grid Power System?
You don’t need to spend months researching charge controller specs to get this right. There are product categories such as tiny homes, solar energy systems, and portable generators, matched to the sizing logic above, so you can move from calculation to checkout without guessing at compatibility.

If you’re just testing the waters, the 100-Watt Portable Briefcase kit is a low-cost way to start generating your own power this week. If you’re ready for a full build, browse the solar energy systems collection for panel, inverter, and battery options sized for tiny-house loads, or check the Tiny Homes page if you’re shopping for a home with power infrastructure already planned in. For a system built around your specific appliance list and roof dimensions, reach out through the off-grid home planning page for a custom quote.
Sources
The EIA provides state-level solar resource data for sun-hour estimates. SolarReviews covers roof-area trade-offs. VoltTech details 48V LiFePO4 architecture. Homeowners weighing solar’s effect on resale value can also read this real estate guide to selling a house with solar panels.
- Eia
- The Pros And Cons Of Solar Panels For Tiny Houses
- Off-Grid Power Systems for Tiny Houses - VoltTech Insights
- Tiny House Solar Calculator — Off-Grid and Mobile Sizing
FAQ
Will a 400W Solar Panel Run a Fridge?
A single 400W panel can generate enough energy on a sunny day to cover a standard fridge’s daily draw of roughly 1 to 2 kWh, but only with a battery bank and inverter to store and convert that power for use overnight and on cloudy days.
How Much Solar Power Do I Need to Run a Tiny Home?
Most tiny homes need 0.5 to 2 kW of solar capacity paired with 5 to 15 kWh of battery storage, with the exact figure depending on whether you’re running minimal loads, comfortable day-to-day use, or a fully electric kitchen and mini-split.
What Is the Best Off-Grid Solar System for a Tiny House?
A 48V LiFePO4 battery bank paired with high-efficiency 400W panels and an MPPT charge controller gives tiny houses the best combination of compact footprint, wiring efficiency, and battery longevity. Gridwiseliving’s starter kits and whole-home solar generators are built around this same architecture.
How Much Does an Off-Grid Tiny Home Cost?
A basic DIY off-grid power setup runs $2,000 to $6,000, a mid-range installed system with a full rooftop array and larger battery bank typically costs $10,000 to $20,000, and a full all-electric build can reach $25,000 to $35,000 or more.